Employer Onboarding
A key piece of the payroll solution is employer onboarding. Employers must submit basic company information, bank account details, and legal paperwork that Zeal uses to run payroll on their behalf. For Partners building an internal payroll solution, onboarding can be done directly from the Partner Dashboard. However, for Partners that want to sell their payroll product to employers, employer onboarding should be integrated within the solution.
In this guide
- How to create a Company.
- How to verify microdeposits.
- How to gather legal documents.
- How to onboard an employer with the white-label Employer Onboarding component.
API
The first step to onboarding an employer using the API is to create a Company. A Company is what Zeal uses to represent an employer's data.
Create a Company
Call Create Company.
Note
Remember to replace the placeholders such as
{{testApiKey}}in the code samples below.
curl --location --request POST 'https://api.zeal.com/companies'
     --header 'Accept: application/json' \
     --header 'Content-Type: application/json'
     --header 'Authorization: Bearer {{testAPIKey}}'
     --data-raw '{
       "partnerID": "{{partnerID}}",
       "first_name": "Richard",
       "last_name": "Hendricks",
       "email": "[email protected]",
       "business_name": "Pied Piper",
       "business_ein": "12-3456789",
       "business_address": "5941 Newell Rd.",
       "business_city": "Palo Alto",
       "business_state": "CA",
       "business_zip": "94303",
       "business_phone": "6504441234",
       "skip_migration": true
     }'
Create a Bank Account
Next we need to submit the bank account that Zeal will use to fund payroll.
Call Create Company Bank Account.
Make sure the
routing_numberis a valid routing number in the United States.
curl --location --request POST 'https://api.zeal.com/companies/bank'
     --header 'Accept: application/json' \
     --header 'Content-Type: application/json'
     --header 'Authorization: Bearer {{testAPIKey}}'
     --data-raw '{
       "companyID": "{{companyID}}",
       "account_number": "123456789",
       "routing_number": "123456789",
     }'
Verify microdeposits
For payroll processing, we need to verify the employer's bank account through microdeposits.
Call Trigger Microdeposits to send the microdeposits to the employer's bank account.
curl --location --request POST 'https://api.zeal.com/companies/microdeposits/trigger'
     --header 'Accept: application/json' \
     --header 'Content-Type: application/json'
     --header 'Authorization: Bearer {{testAPIKey}}'
     --data-raw '{
       "companyID": "{{companyID}}",
     }'
The microdeposits should appear in the employers bank account within 2-3 business days. Collect the deposit amounts from the employer and call Verify Microdeposit Values.
curl --location --request POST 'https://api.zeal.com/companies/microdeposits/verify'
     --header 'Accept: application/json' \
     --header 'Content-Type: application/json'
     --header 'Authorization: Bearer {{testAPIKey}}'
     --data-raw '{
       "companyID": "{{companyID}}",
       "deposits": [
       		"0.14",
          "0.09"
       ]
     }'
With the bank account added and verified, you can move to the next step.
Gather documents
For Zeal to legally process payroll for an employer, we require authorization documents.
Call Get Company Authorization Documents to get links to the documents which must be signed.
curl --location --request GET 'https://api.zeal.com/companies/authorization_documents?companyID={{companyID}}&document_key=all'
     --header 'Accept: application/json' \
     --header 'Content-Type: application/json'
     --header 'Authorization: Bearer {{testAPIKey}}'
Use the links returned to present the documents to the employer. Gather their signature for the documents as a base64 string, then call Sign Company Authorization Documents.
curl --location --request POST 'https://api.zeal.com/companies/authorization_documents'
     --header 'Accept: application/json' \
     --header 'Content-Type: application/json'
     --header 'Authorization: Bearer {{testAPIKey}}'
     --data-raw '{
       "companyID": "{{companyID}}",
       "document_key": "all",
       "signature": "iVBORw23goAAAANSUhEUgAAAtsAAABdCAYAAAB0BqpEAAABRmlDQ1BJQ0MgUHJvZmlscccKJFjYGASSSwoyGFhYGDIzSspCnJ3UoiIjFJgf8bAwiDLwMfAxSCYmFxc4BgQ4ANUwgCjUcG3awyMIPqyLsispF"
     }'
With the documents signed and submitted, you can proceed to the final step.
Update the onboarded status
Lastly, we need to update the onboarded status of the employer. Zeal will perform internal checks to ensure that the employer can be onboarded.
Call Set Company Onboarded Status to True.
curl --location --request POST 'https://api.zeal.com/companies/onboardCompany'
     --header 'Accept: application/json' \
     --header 'Content-Type: application/json'
     --header 'Authorization: Bearer {{testAPIKey}}'
     --data-raw '{
       "companyID": "{{companyID}}",
     }'
White-Label
Onboarding employers through Zeal's white-label Employer Onboarding component reduces complexity and cuts down on developer work.
Pre-fill company profile information (optional)
In some cases, you may prefer to pre-fill the company profile information with details already collected. This helps reduce friction and provides a better experience for the employer.
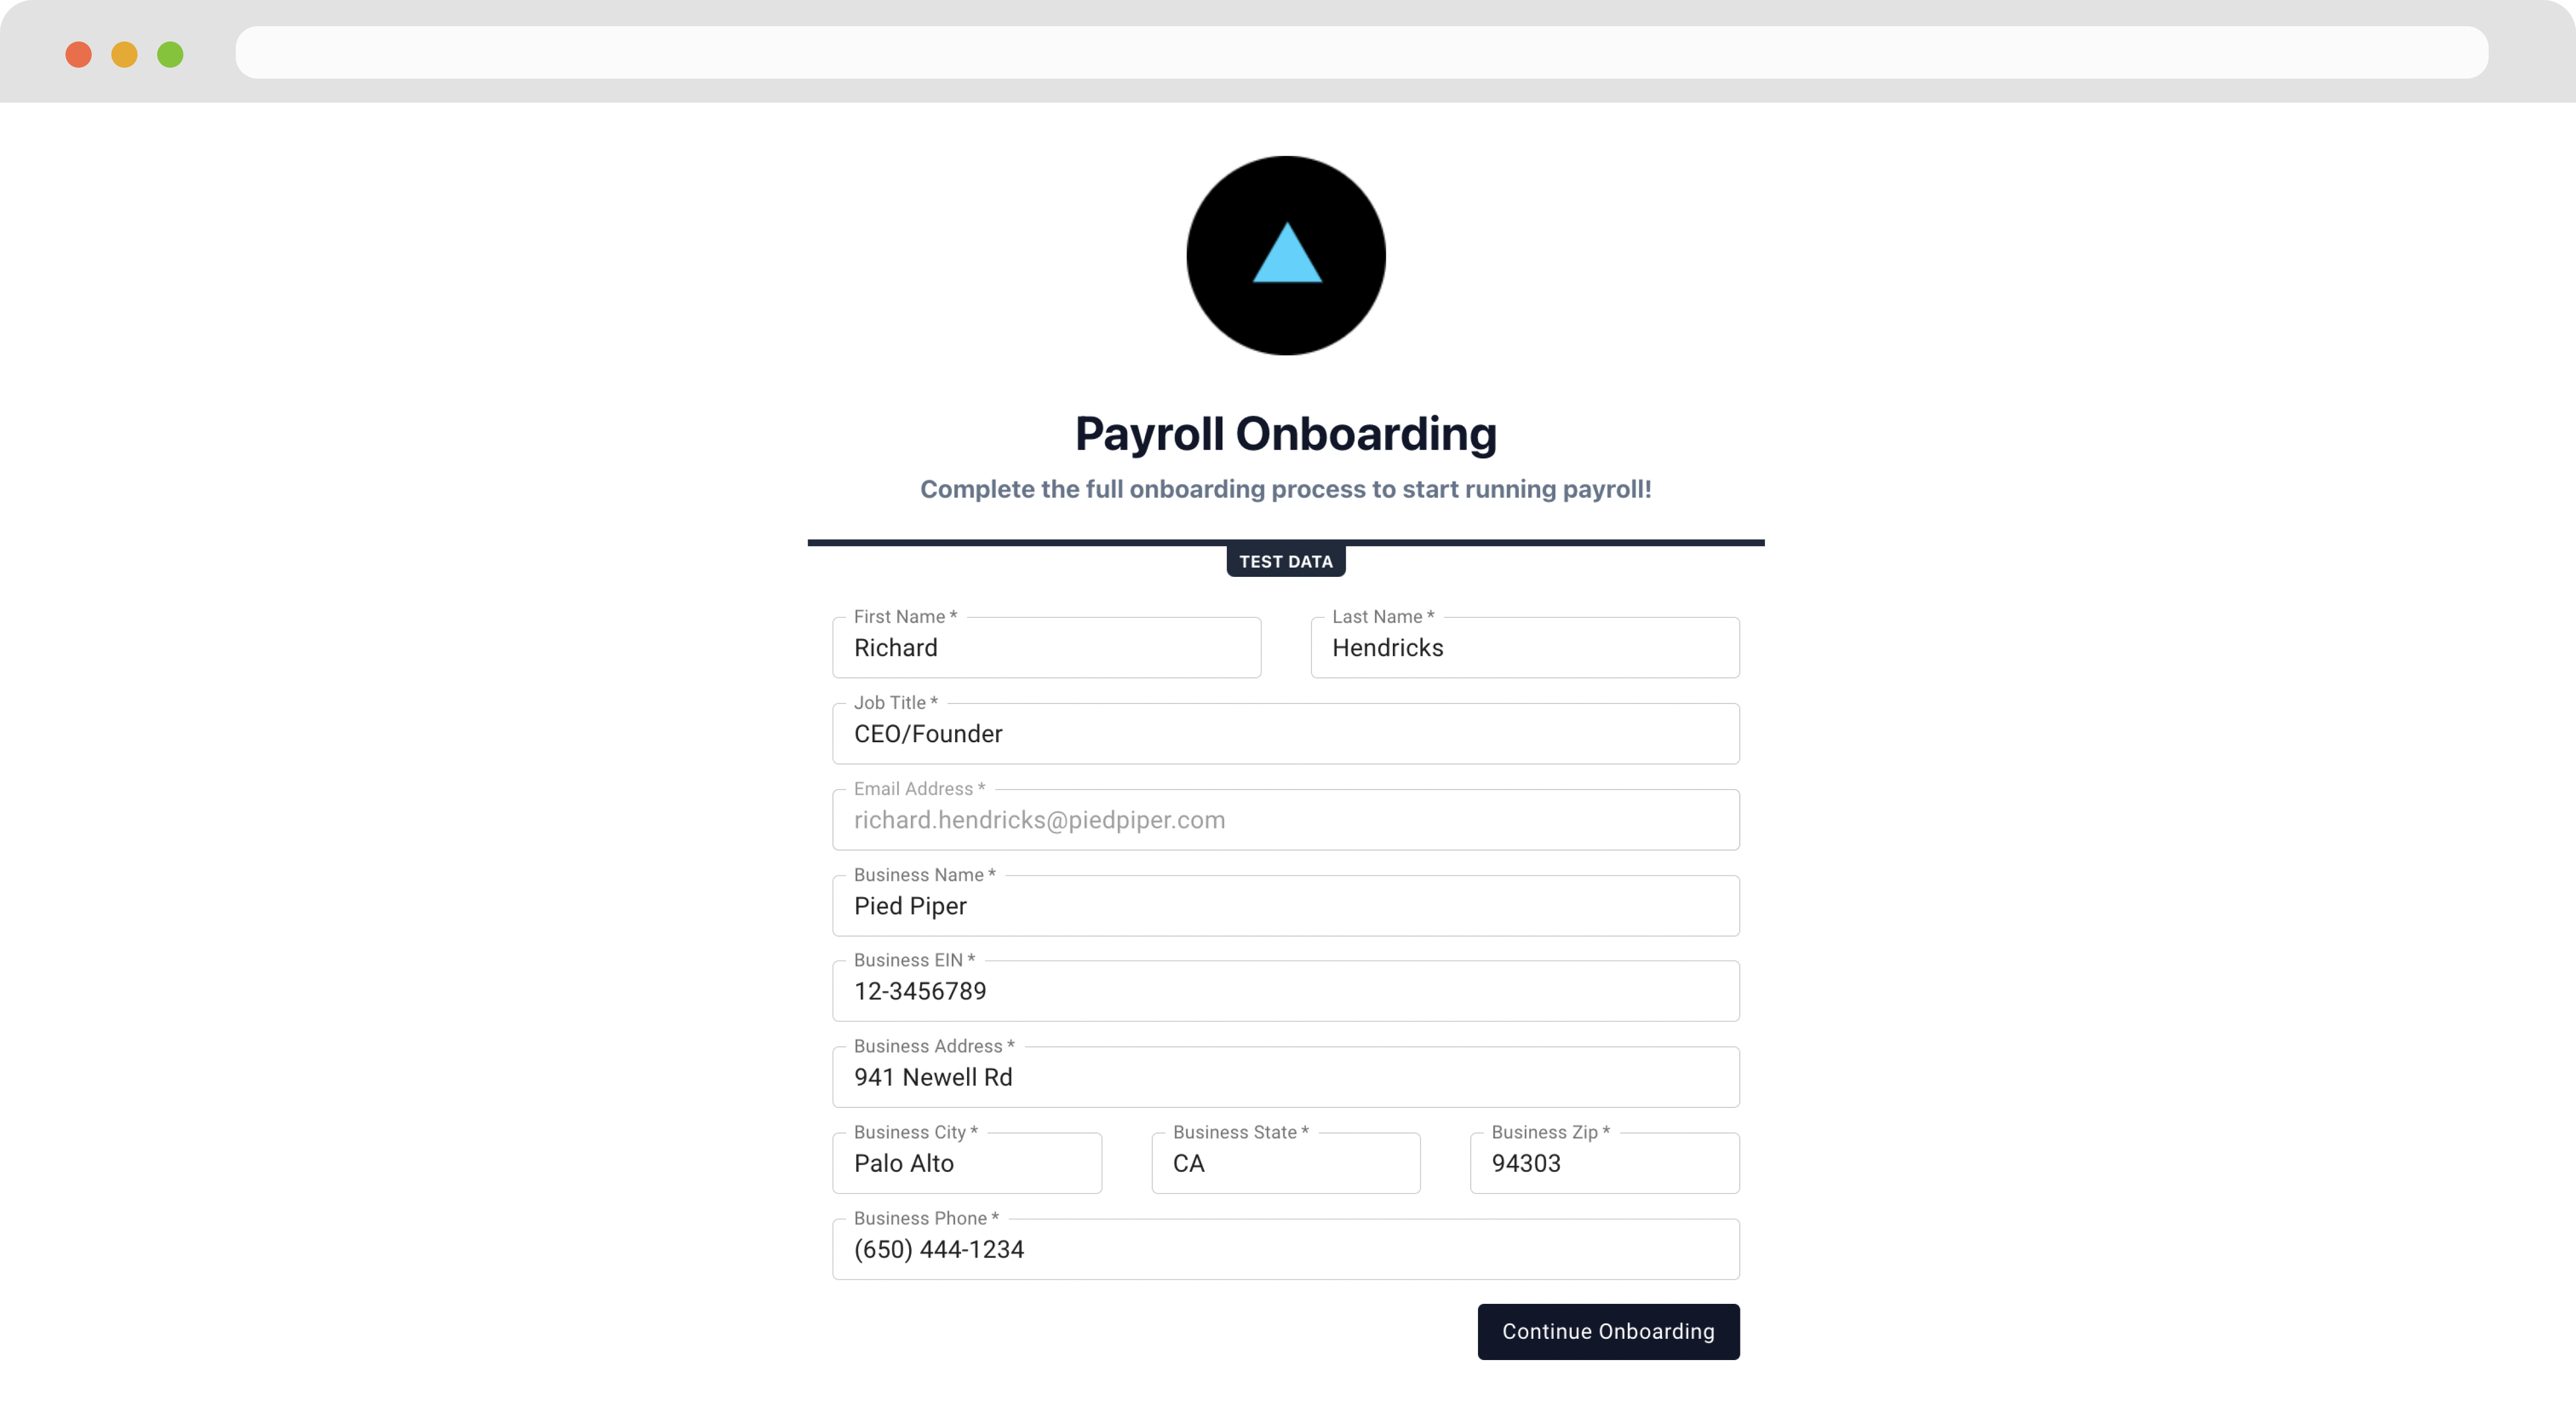
Call Create Company to submit the company information. This will return a JSON object representing the Company data.
Note
Remember to replace the placeholders such as
{{testApiKey}}in the code samples below.
curl --location --request POST 'https://api.zeal.com/companies'
     --header 'Accept: application/json' \
     --header 'Content-Type: application/json'
     --header 'Authorization: Bearer {{testAPIKey}}'
     --data-raw '{
       "partnerID": "{{partnerID}}",
       "first_name": "Richard",
       "last_name": "Hendricks",
       "email": "[email protected]",
       "business_name": "Pied Piper",
       "business_ein": "12-3456789",
       "business_address": "5941 Newell Rd.",
       "business_city": "Palo Alto",
       "business_state": "CA",
       "business_zip": "94303",
       "business_phone": "6504441234",
       "skip_migration": true
     }'
Get the companyID from the returned data and include it in the next step.
Onboarding Flow
Call Get Company Onboarding Link. This returns a link to the white-label component.
Note
If you previously created the company and want Zeal to pre-fill the first section of the onboarding flow, add the
companyIDas a query parameter in the call below.
curl --request GET \
     --url 'https://api.zeal.com/companies/onboard?partnerID={{partnerID}}' \
     --header 'Accept: application/json' \
     --header 'Authorization: Bearer {{testApiKey}}'
Give the employer access to the link. Generally our partners chose to include the link in their application or display the component directly within an iframe.
<a href="{{companyOnboardingLink}}">Click to begin payroll onboarding!</a>
When the employer accesses the link and they see the white-label component on your domain with your logo. First, the employer completes the Profile Information section.

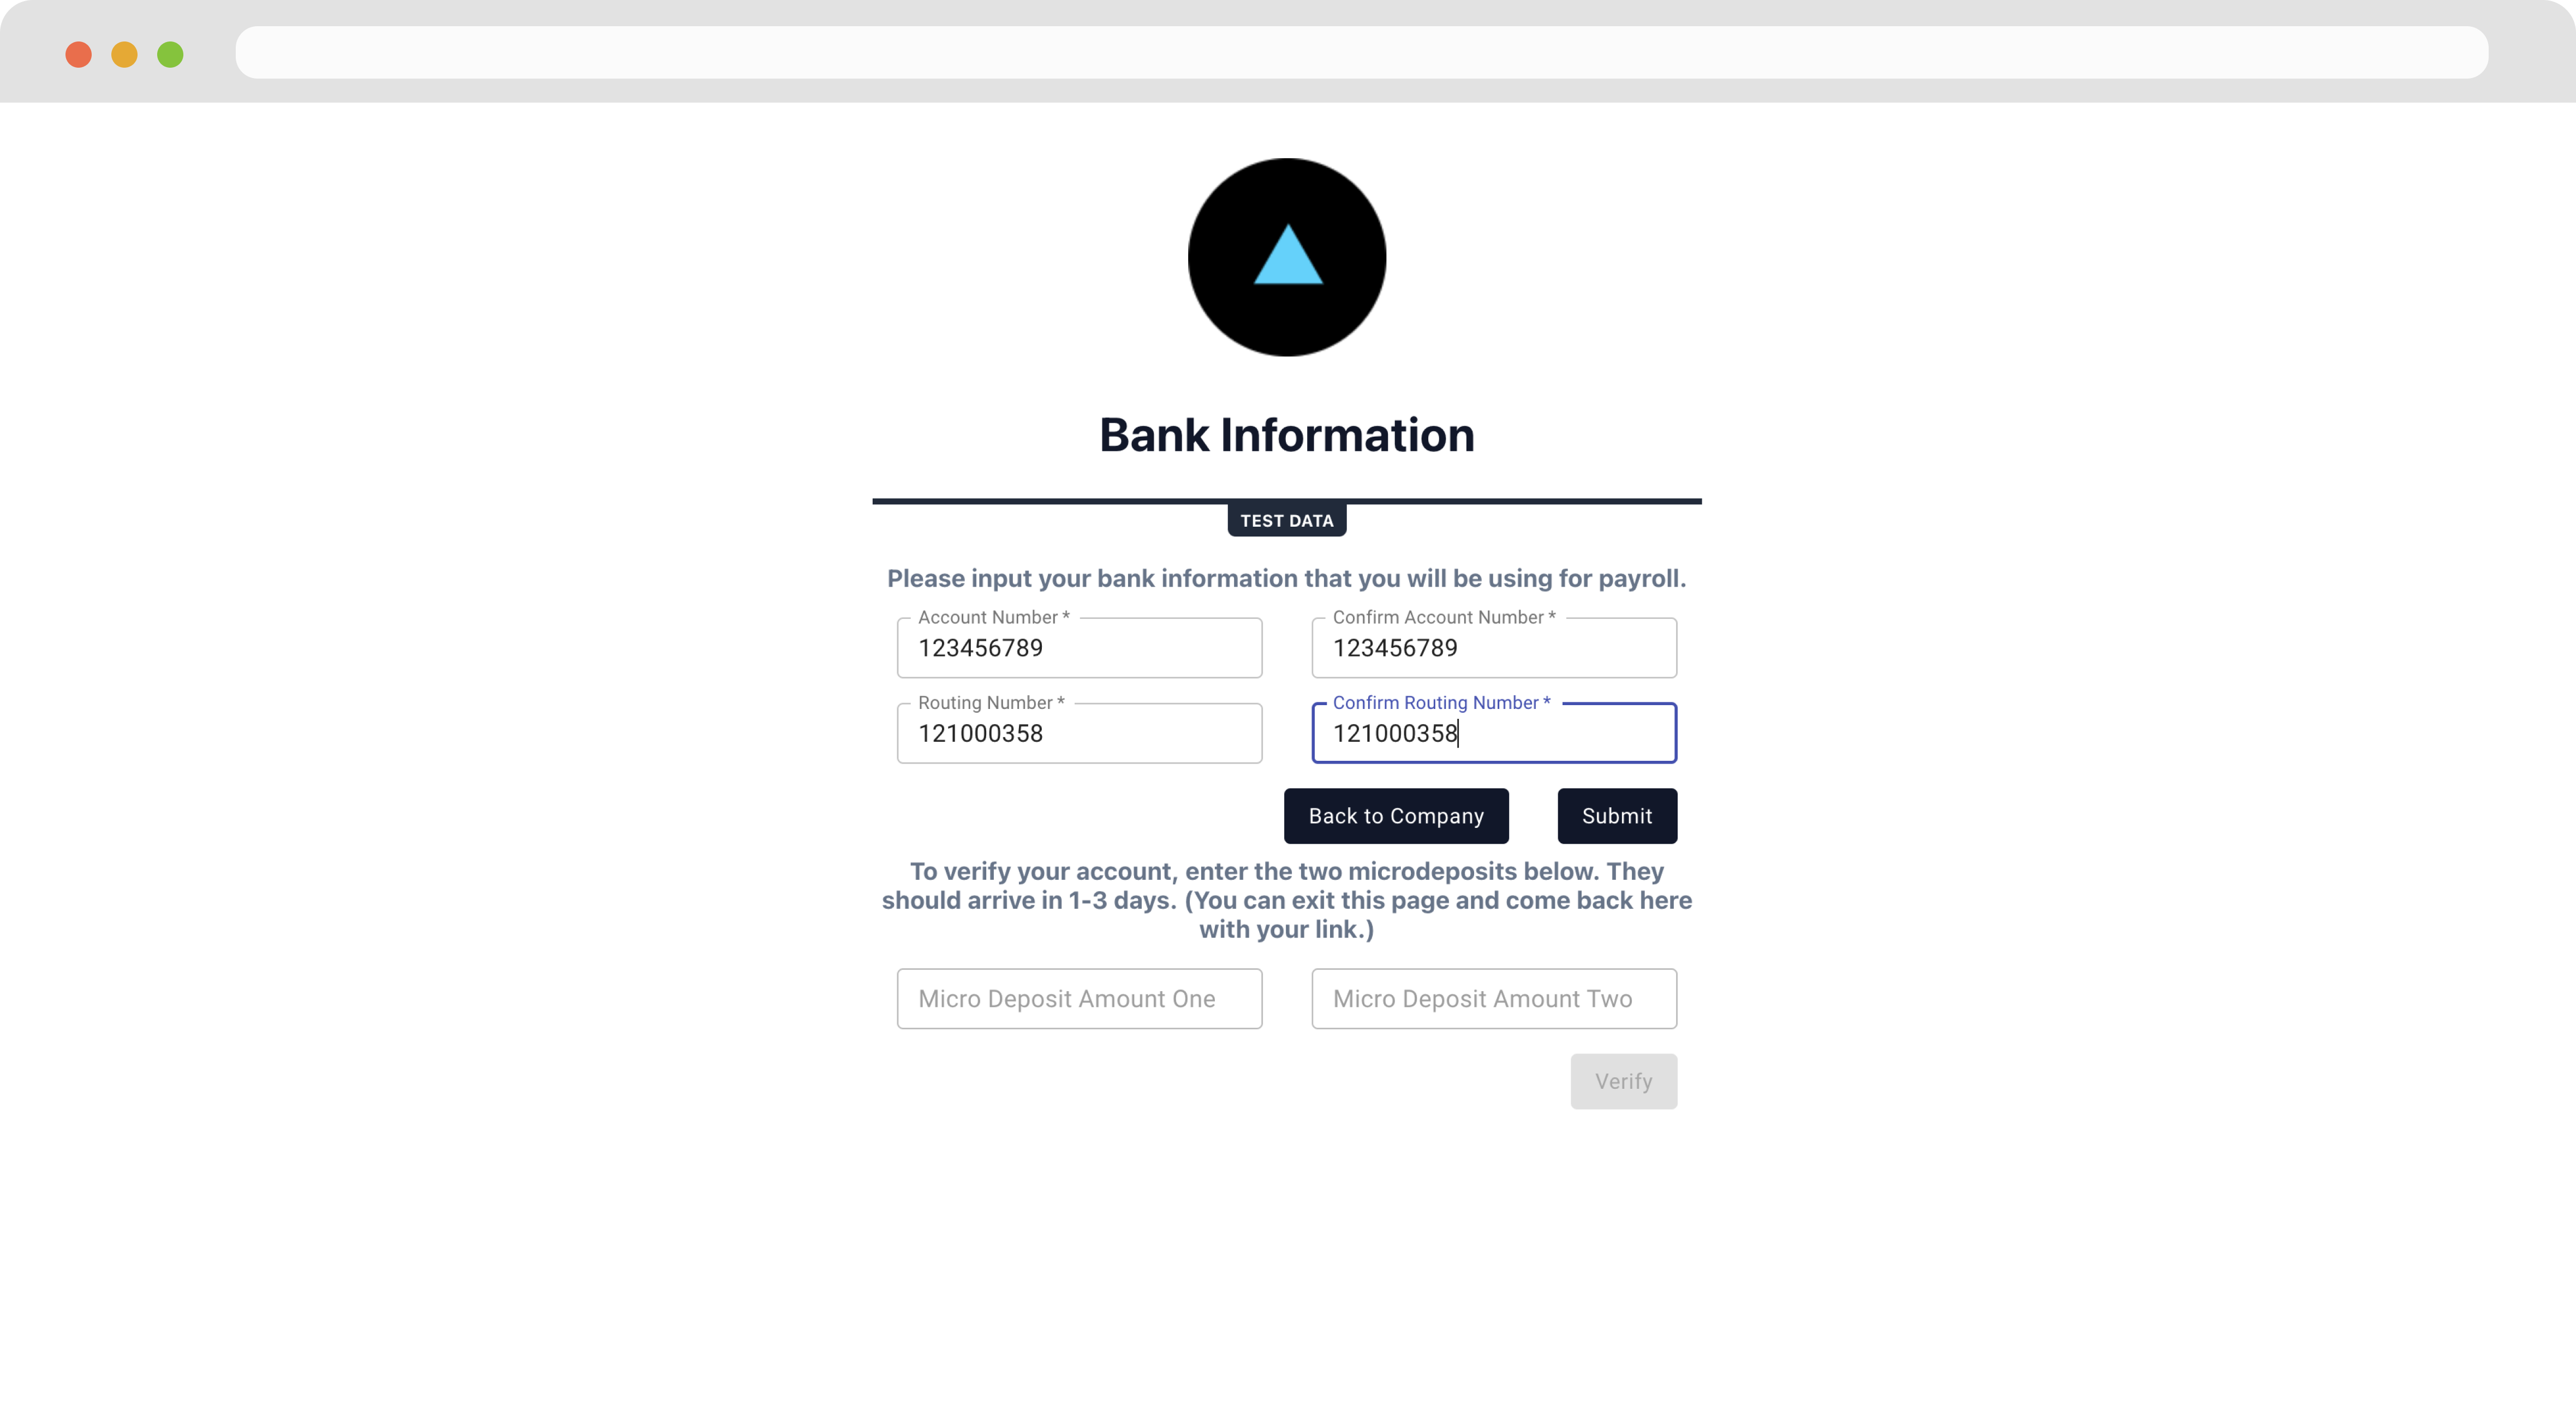
Next, the employer completes the Bank Verification. This step requires a micro-deposit flow where two small deposits are made to the employer’s bank account. The employer will leave the onboarding flow and return later to confirm the deposit amount. The micro-deposit flow generally takes 1 - 3 days.

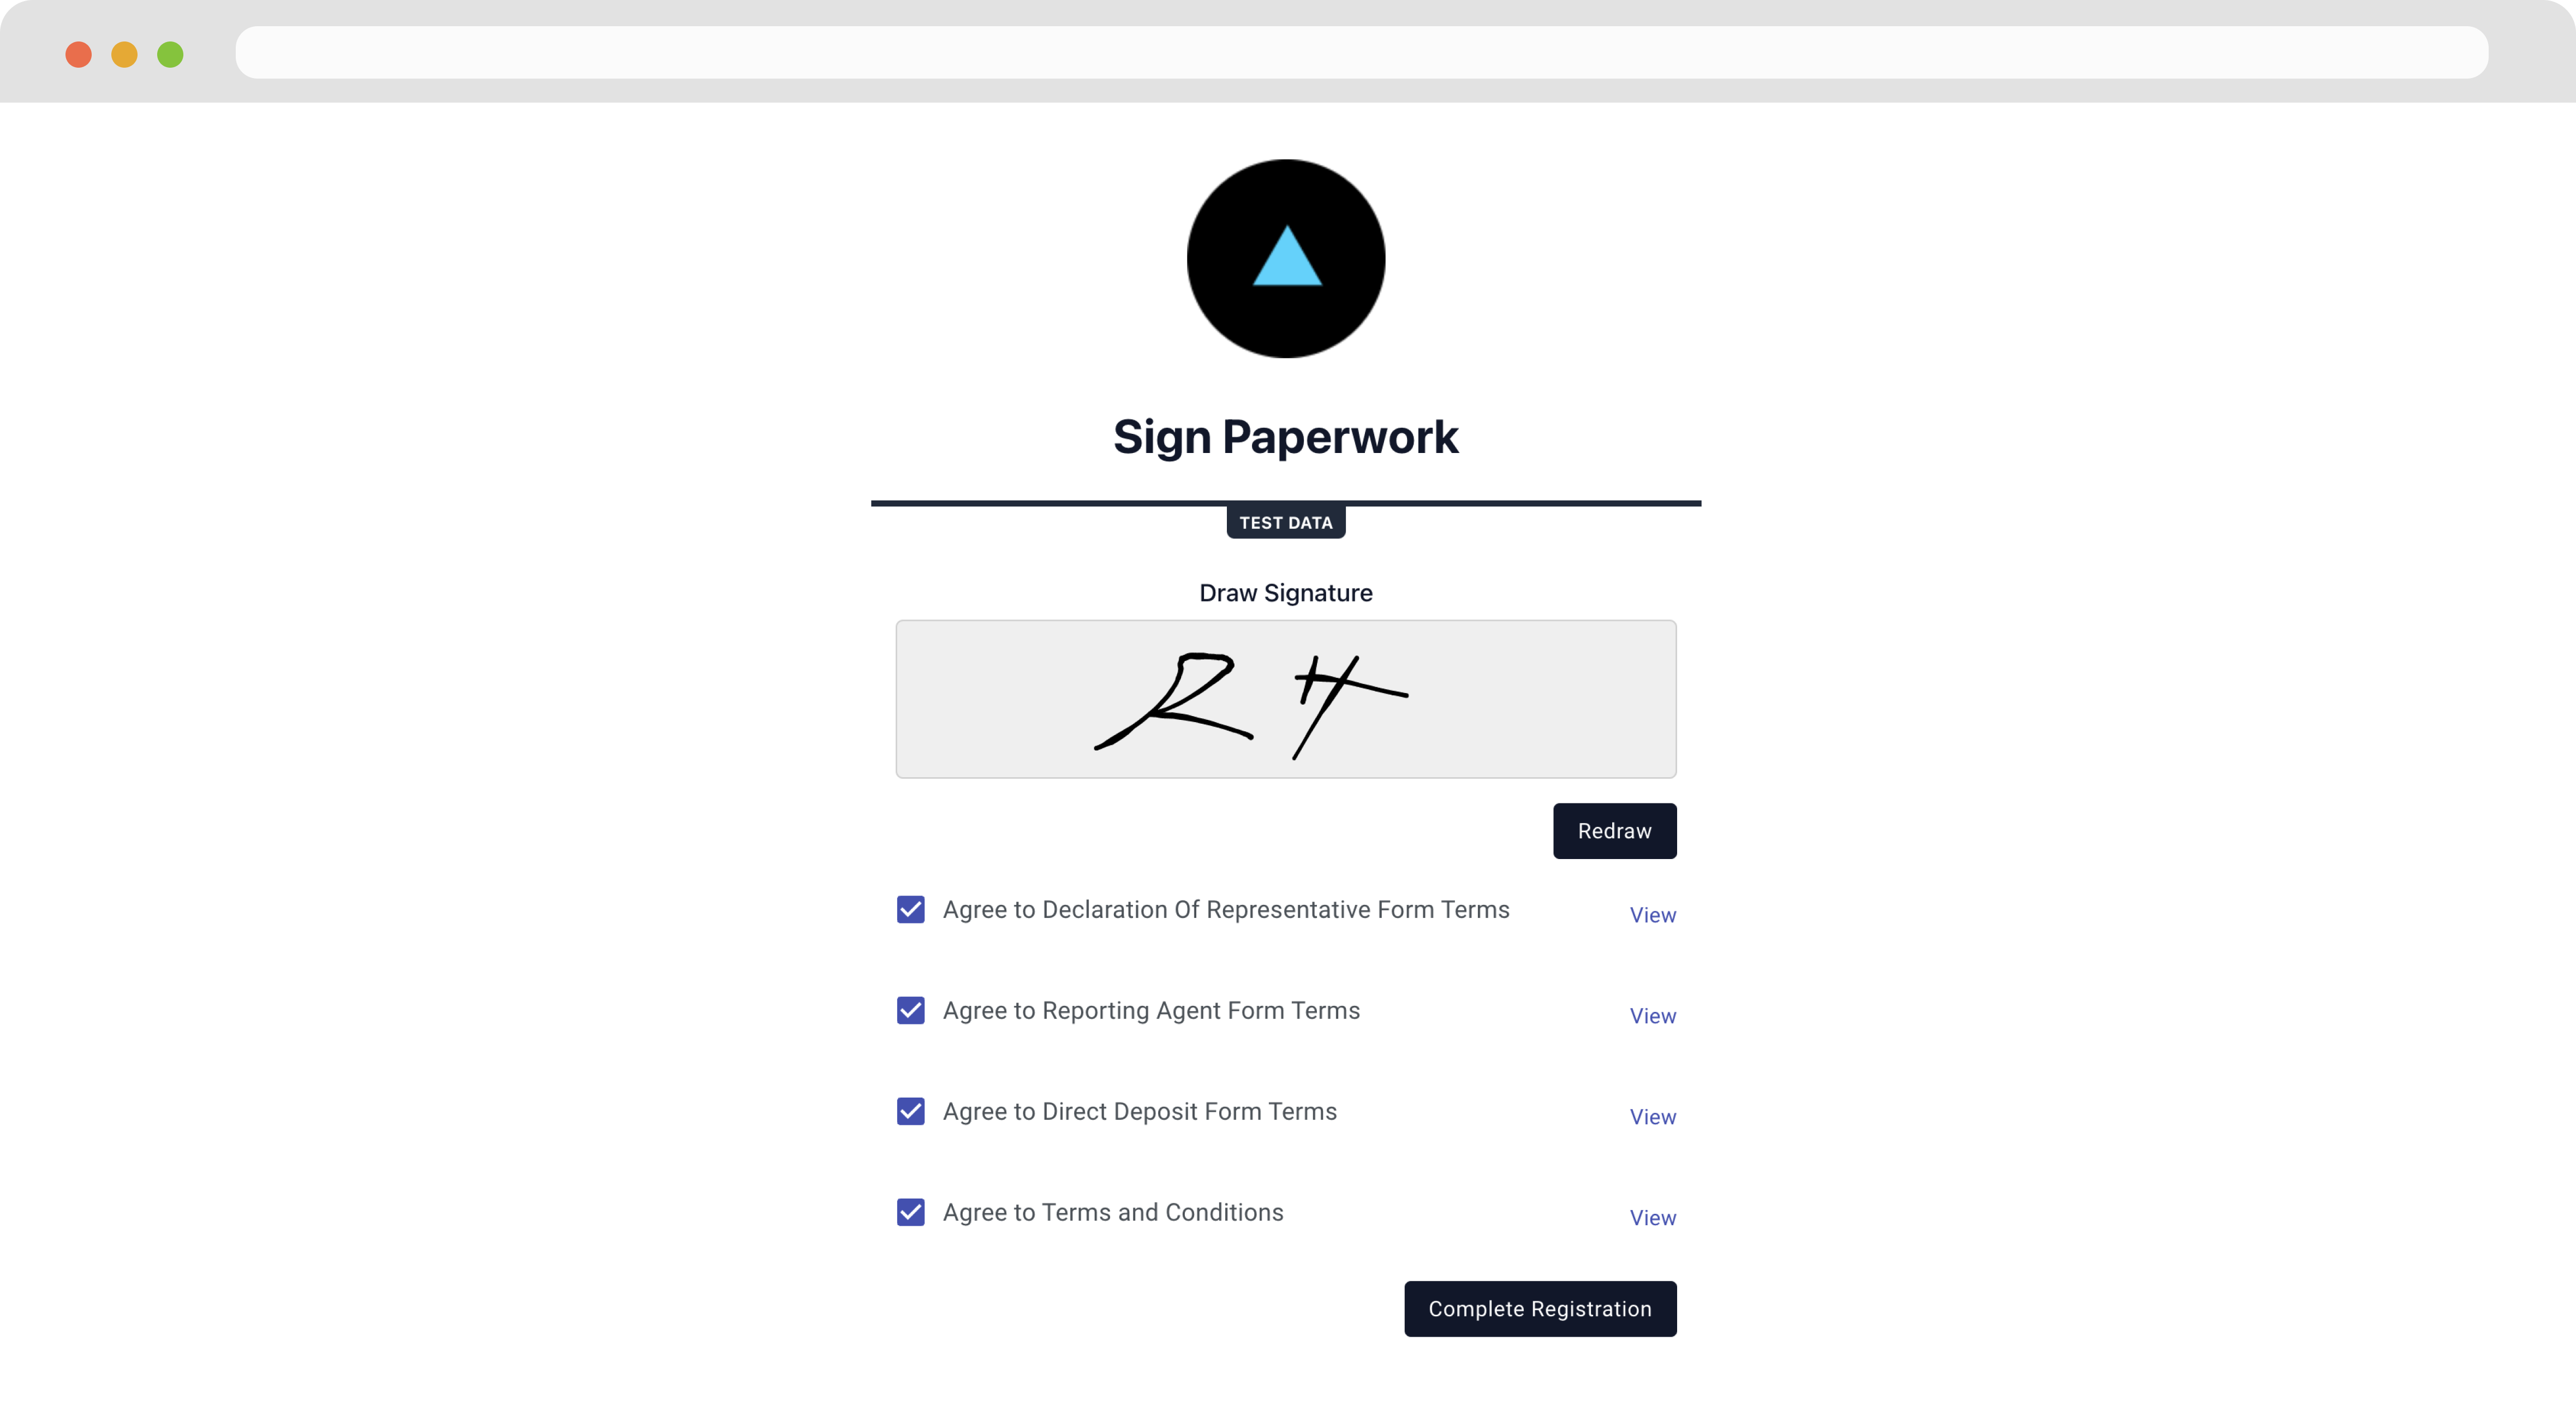
Finally in the Paperwork section, the employer signs and agrees to the documents Zeal needs to process payroll.

Note
When the company onboarding flow is completed successfully, Zeal sends this company's information to the webhook you've set for the Company Onboarding Event.
Recap
- To onboard an employer, company information, bank account, and legal paperwork need to be submitted.
- Bank accounts must be verified through a microdeposit flow which can take up to 2-3 business days.
- Authorization documents must be signed for Zeal to legally begin processing payroll for the employer.
- Employers can complete onboarding through the Employer Onboarding component.
Updated about 2 months ago
