> ## Documentation Index
> Fetch the complete documentation index at: https://docs.zeal.com/llms.txt
> Use this file to discover all available pages before exploring further.
# Time & Attendance Integration
> One of the best features of Zeal is how easily it can be integrated with other systems in order to automate traditionally manual processes.
### **Tip**
Watch the [video demo](https://www.loom.com/share/ad92a80e6e924a379b45c74ac4a21046) to get an overview of the integration before starting the guide!
One of the best features of Zeal is how easily it can be integrated with other systems in order to automate traditionally manual processes. For example, many of our partners connect Zeal's APIs with a time and attendance system in order to automate the submission of Employee Checks.
While there are many things you can do with a time and attendance system, this guide will get us started by walking through a simple integration with a popular free time-keeping app, [Clockify](https://clockify.me/).
## In this guide
* How to set up a Clockify account.
* How to stand up a server to convert Clockify Time Entry data to Zeal Employee Checks.
* What the code does.
***
## Clockify account setup
First, we'll create a Clockify account and generate an API key.
Navigate to the [Clockify Signup Page](https://app.clockify.me/tracker) and follow the steps to create an account. Once your account is created, navigate to your [user settings](https://app.clockify.me/user/settings), scroll to the bottom, and click **Generate** under the API section.
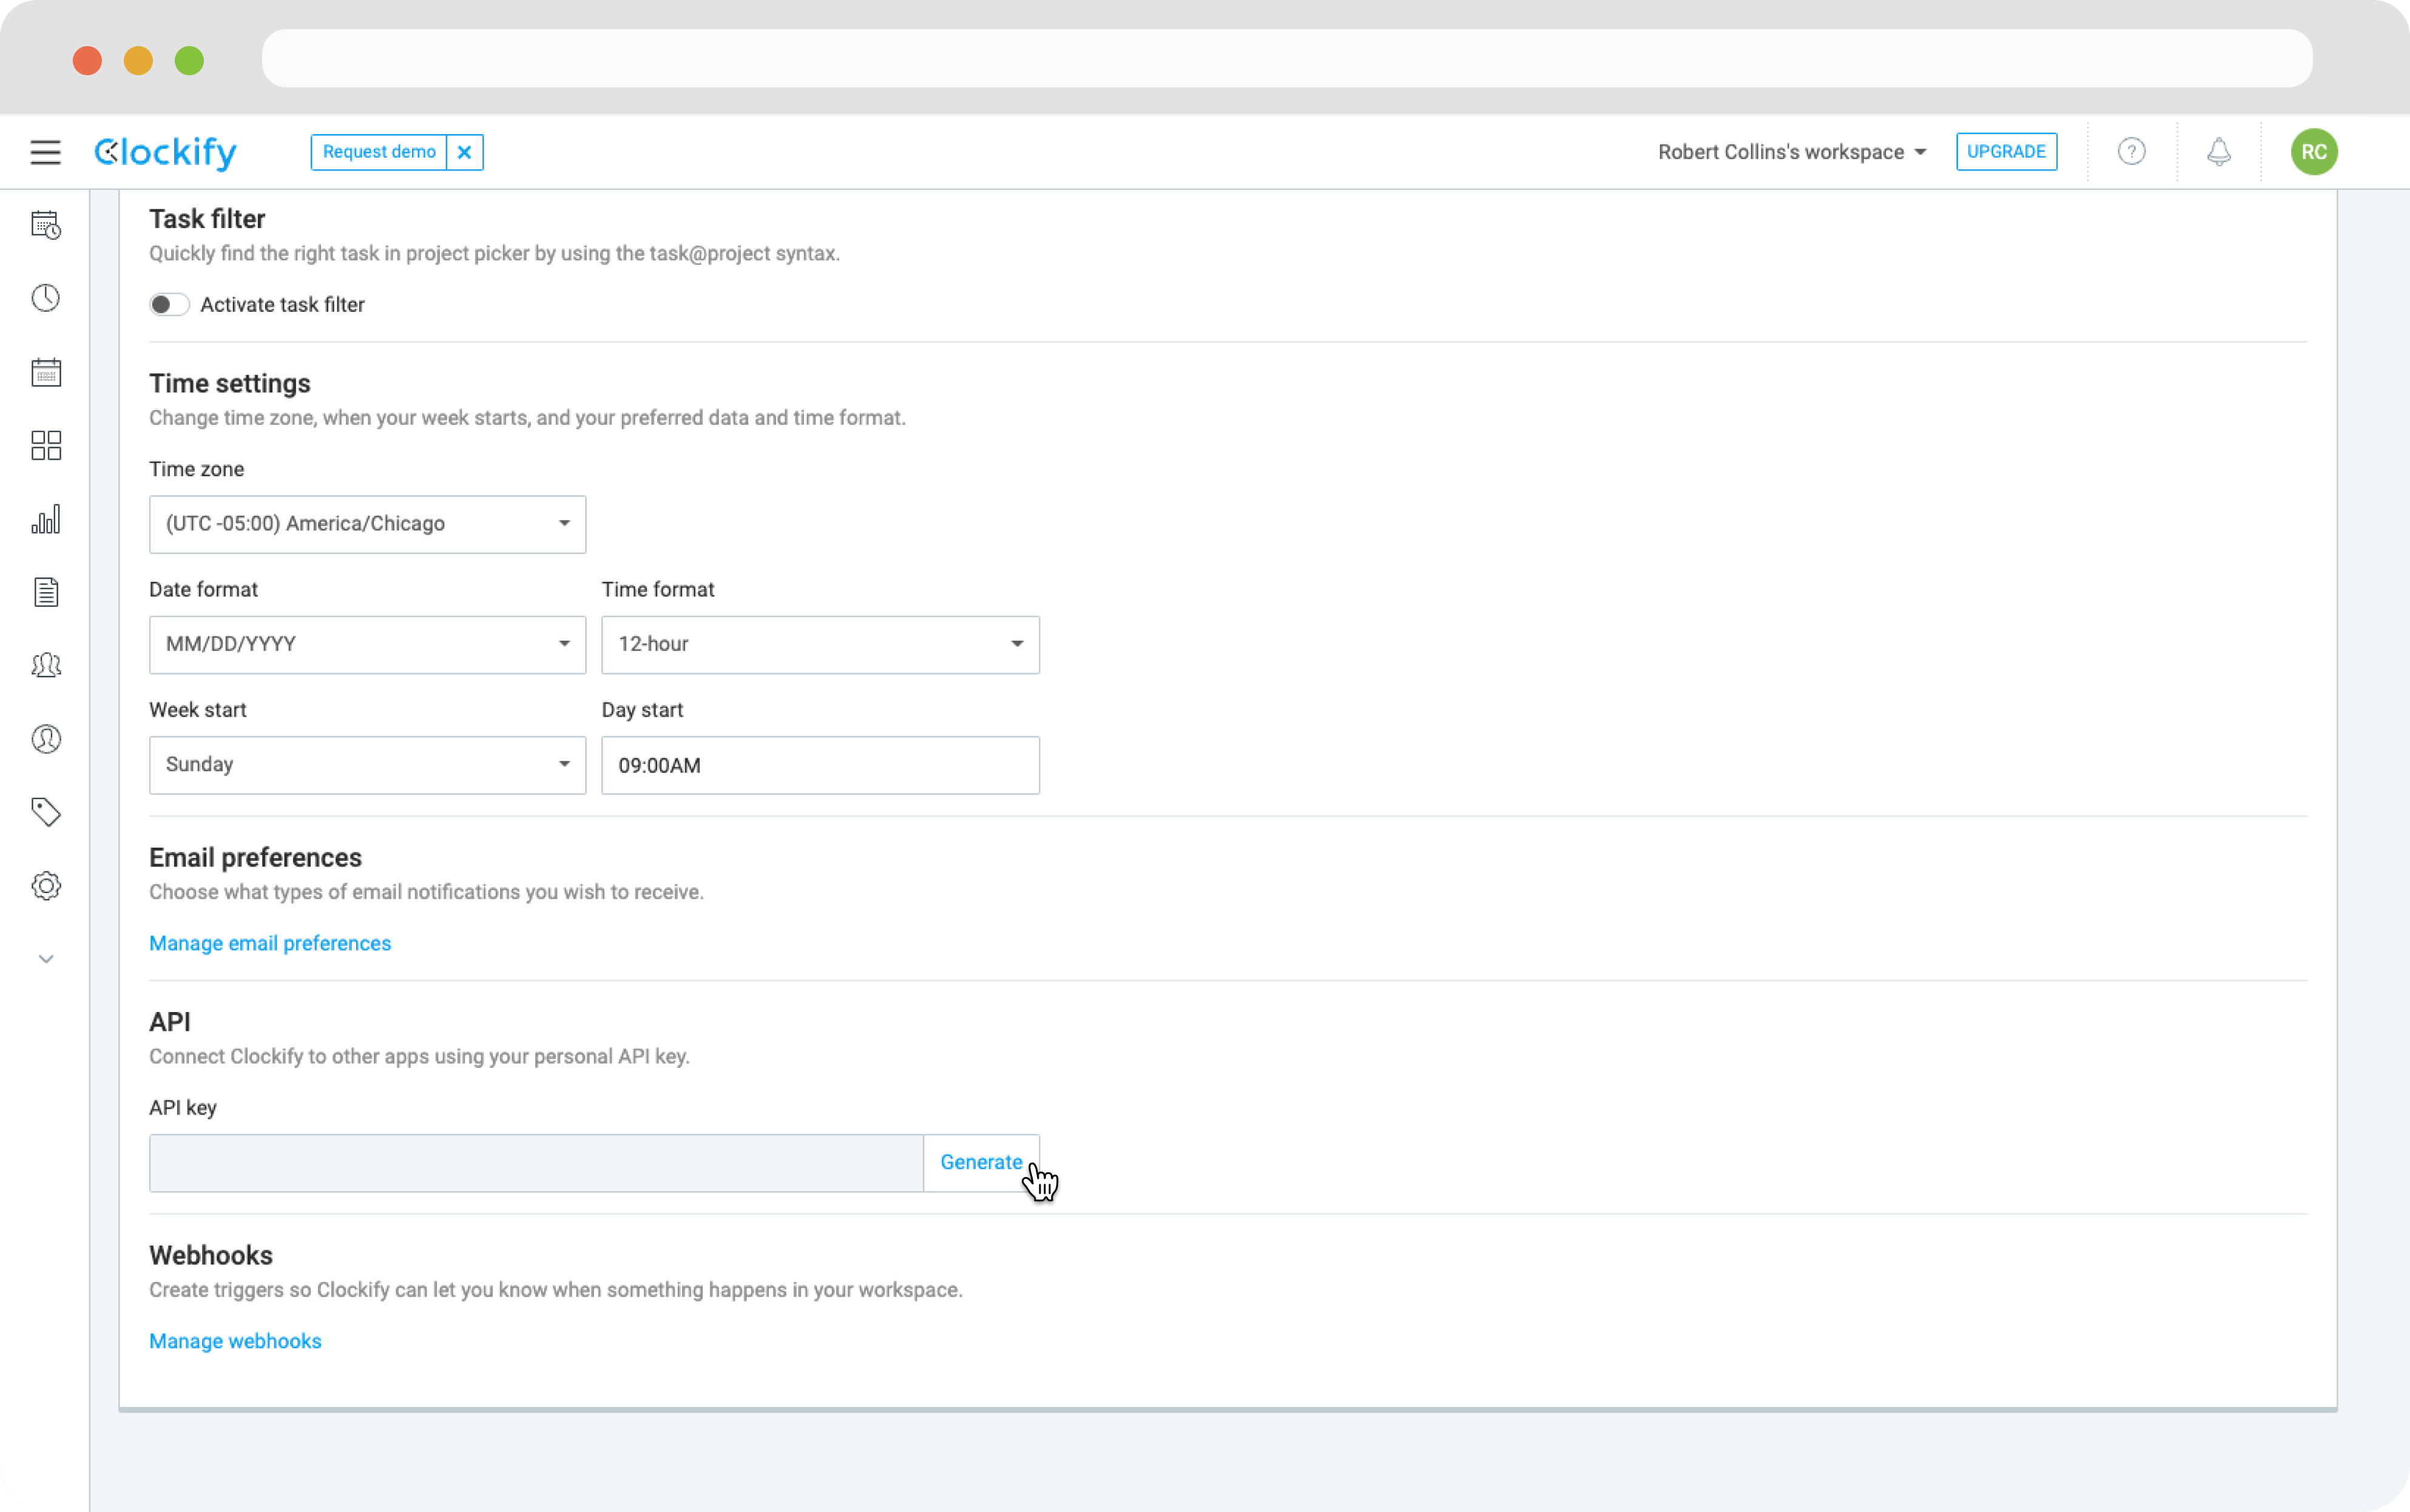 Store the API Key for the next step.
## Stand up the server
In this step, we'll set up a Node (Express) server to receive incoming data from Clockify. In order for webhooks from Clockify to reach our local server, we'll need to expose it to the internet. There are many ways of doing this, but we'll be using [ngrok](https://ngrok.com/).
### Associate a Zeal employee with our Clockify account
The first thing we'll want to do before we get our server up and running, is establish a connection between our Zeal Employee and our Clockify Account. In a production application, we'd establish a process to do this automatically whenever a new employee onboards to Clockify, but for now we'll do it manually.
Using your Clockify API key from the previous step, run the following curl command.
```bash bash theme={null}
curl -H "content-type: application/json" -H "X-Api-Key: {{YOUR API KEY}}" -X GET https://api.clockify.me/api/v1/user
```
Use the `id` field from the response to add an `external_id` to your Zeal Employee.
```bash bash theme={null}
curl --request PATCH \
--url https://api.zeal.com/employees \
--header 'accept: application/json' \
--header 'content-type: application/json' \
--data '
{
"employee": {
"employeeID": "{{employeeID}}",
"external_id": "{{clockifyUserID}}"
},
"companyID": "{{companyID}}"
}
'
```
Now that our Employee is linked with our Clockify Account we can set up the server.
### Set up an Express server
Clone our example repository at [https://github.com/zeal-corp/zeal-clockify-integration-example](https://github.com/zeal-corp/zeal-clockify-integration-example).
```bash bash theme={null}
git clone [email protected]:zeal-corp/zeal-clockify-integration-example.git
```
Create a `.env` in the root directory and add your Zeal Test API Key and the Company ID.
```bash bash theme={null}
echo "ZEAL_TEST_KEY=YOUR TEST KEY\nZEAL_COMPANY_ID=YOUR COMPANY ID" >> .env
```
### Note
For the scope of this example, we'll only process time entries for one company so use the ID of the company containing the Zeal Employee from the previous step.
With our environmental variables configured, we can start the server by running `npm run dev`. You should see the following output in your terminal.
```bash bash theme={null}
$ 🦓🦓🦓 [SERVER_START]: Server is running at http://localhost:3000
```
### Expose the server to the public web using ngrok
Next we'll need to install ngrok and configure our ngrok authorization token. Follow the instructions [here](https://ngrok.com/download) to do so.
Once the configuration of ngrok is complete we can run the following line in the terminal to expose our Express server to the internet.
```bash bash theme={null}
ngrok http 3000
```
An ngrok window will open in your terminal and display the following:
```bash bash theme={null}
Session Status online
Account Your Name (Plan: Free)
Version 3.0.7
Region South America (sa)
Latency 157ms
Web Interface http://127.0.0.1:4040
Forwarding https://83d8-193-37-252-220.sa.ngrok.io -> http://
Connections ttl opn rt1 rt5 p50 p90
2 0 0.01 0.00 5.20 5.39
HTTP Requests
----------------
```
Copy the URL displayed next to the `Forwarding` field and store it for use in the next step. **Note:** don't stop ngrok or your Express server.
```
Forwarding https://83d8-193-37-252-220.sa.ngrok.io
```
### Add a webhook URL in Clockify
Now we want to configure our webhook in our Clockify dashboard.
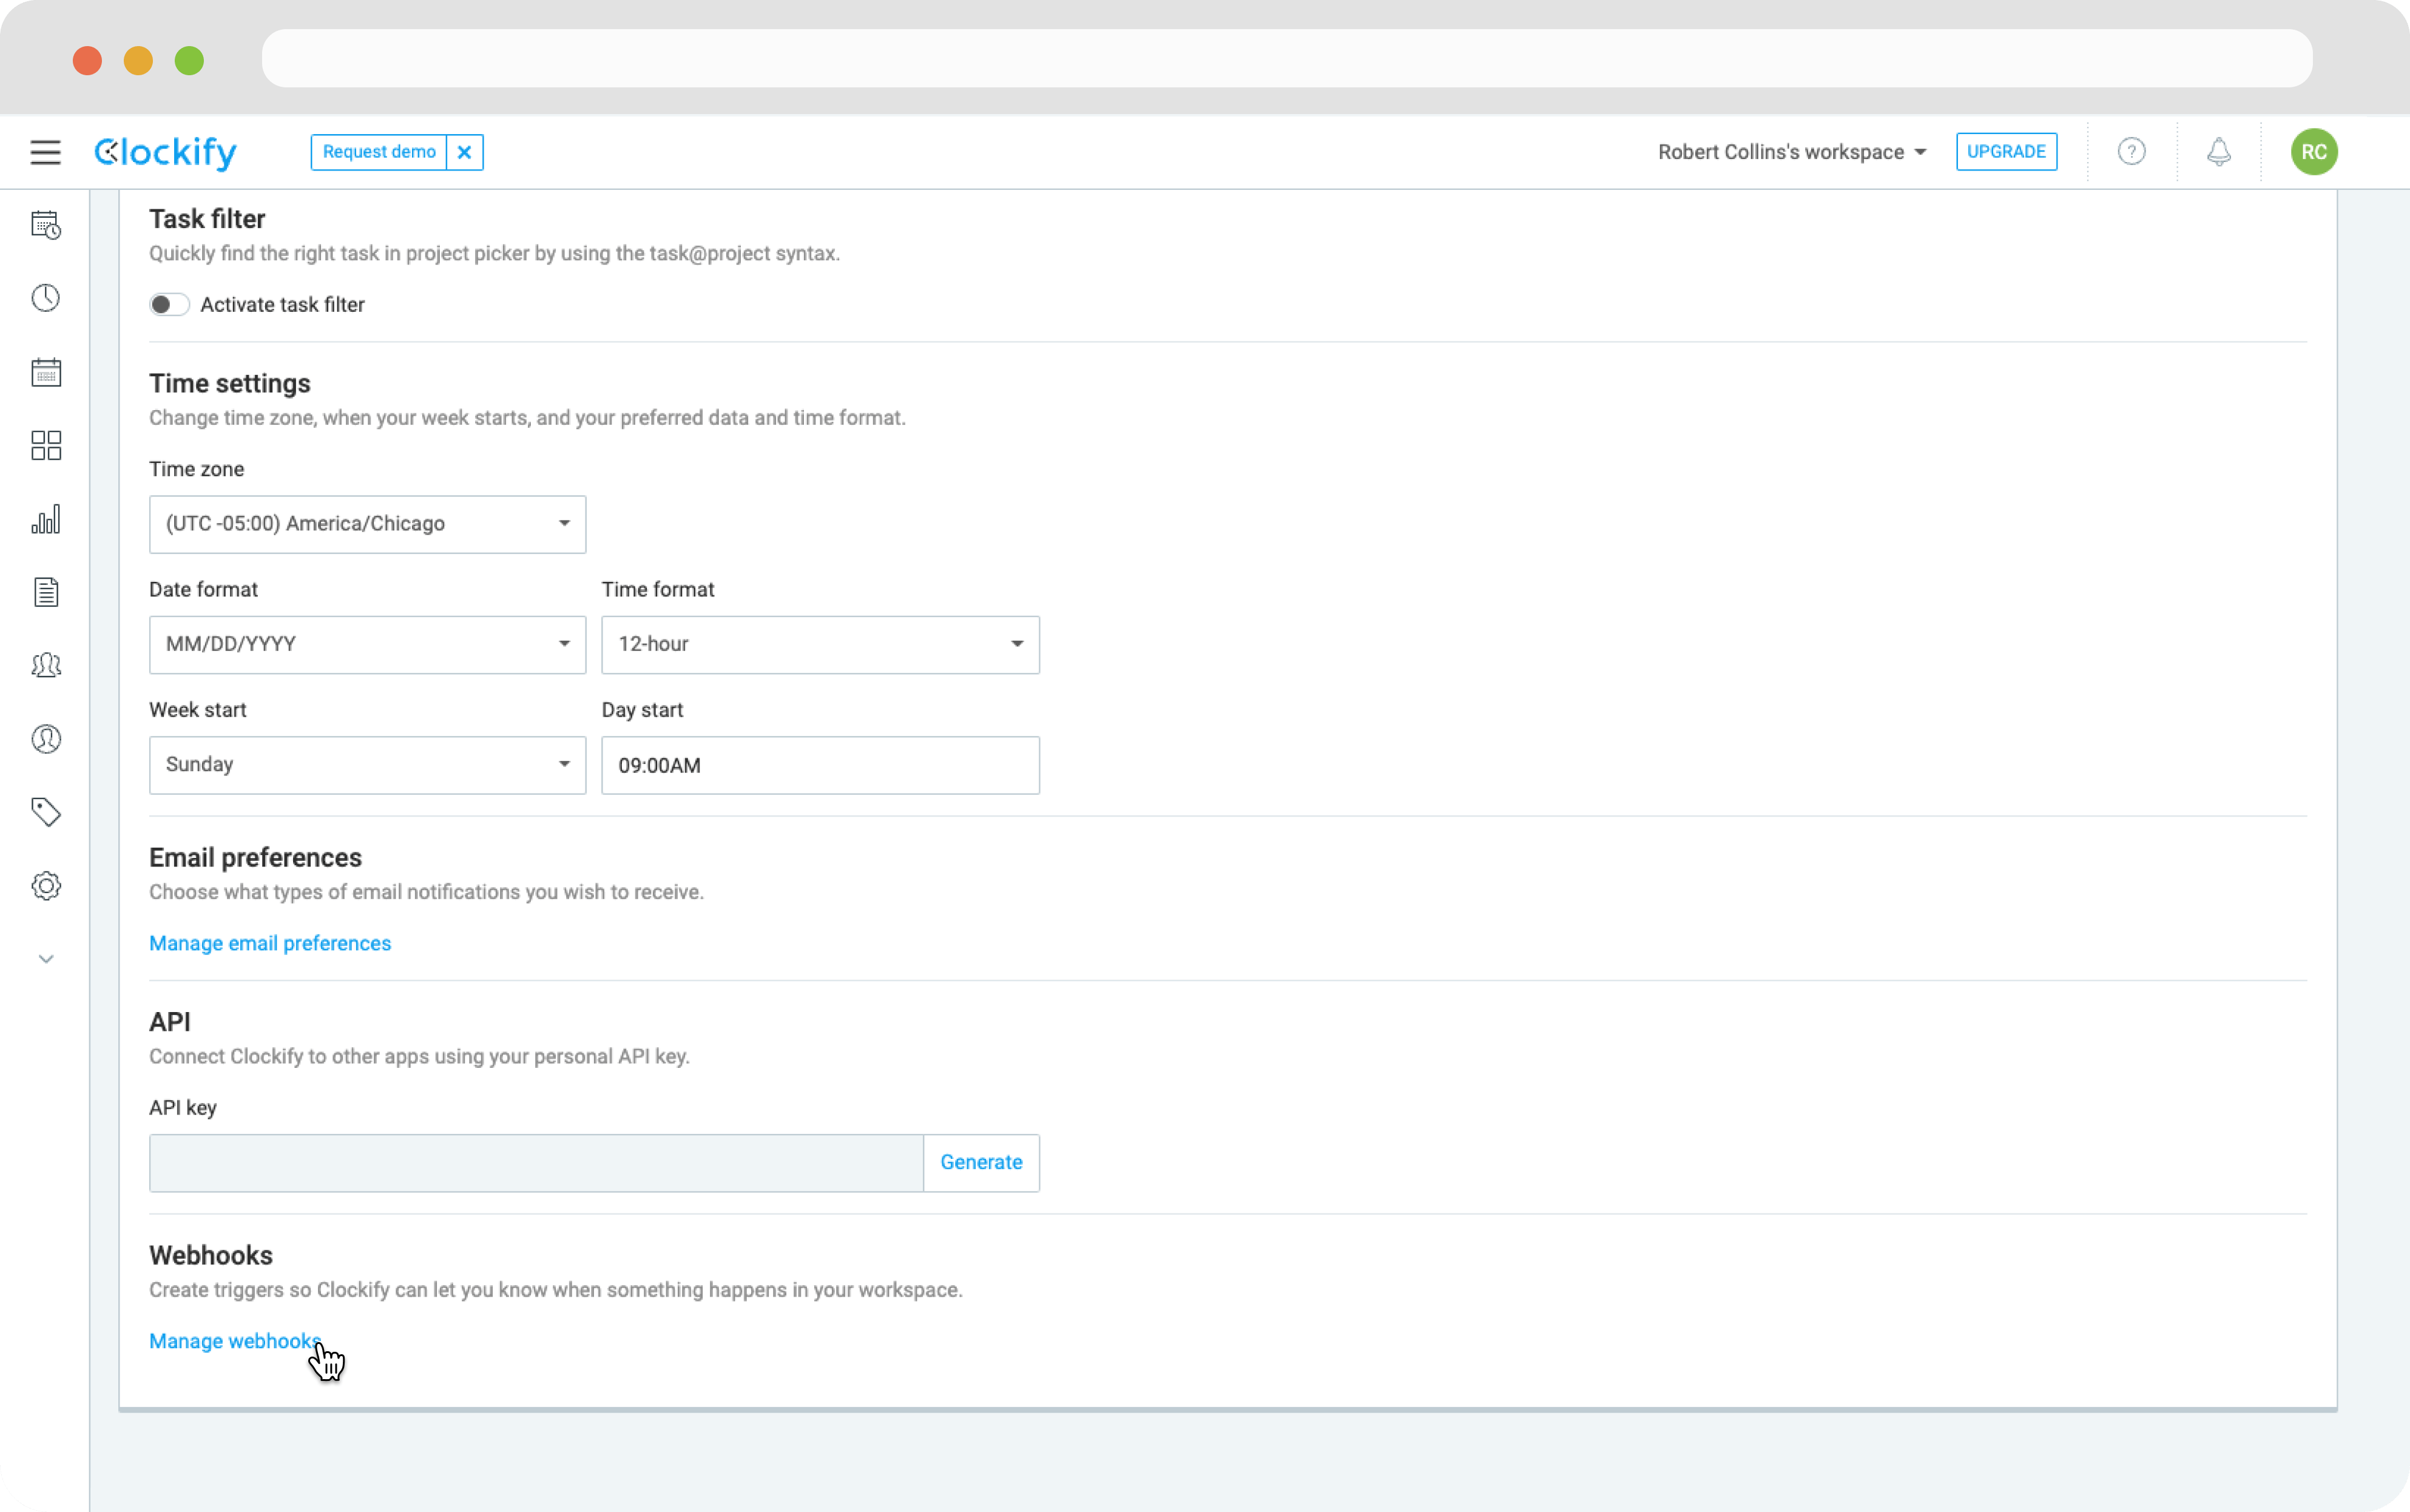
Navigate back to the [user settings](https://app.clockify.me/user/settings) in Clockify and click **Manage webhooks** at the bottom.
Store the API Key for the next step.
## Stand up the server
In this step, we'll set up a Node (Express) server to receive incoming data from Clockify. In order for webhooks from Clockify to reach our local server, we'll need to expose it to the internet. There are many ways of doing this, but we'll be using [ngrok](https://ngrok.com/).
### Associate a Zeal employee with our Clockify account
The first thing we'll want to do before we get our server up and running, is establish a connection between our Zeal Employee and our Clockify Account. In a production application, we'd establish a process to do this automatically whenever a new employee onboards to Clockify, but for now we'll do it manually.
Using your Clockify API key from the previous step, run the following curl command.
```bash bash theme={null}
curl -H "content-type: application/json" -H "X-Api-Key: {{YOUR API KEY}}" -X GET https://api.clockify.me/api/v1/user
```
Use the `id` field from the response to add an `external_id` to your Zeal Employee.
```bash bash theme={null}
curl --request PATCH \
--url https://api.zeal.com/employees \
--header 'accept: application/json' \
--header 'content-type: application/json' \
--data '
{
"employee": {
"employeeID": "{{employeeID}}",
"external_id": "{{clockifyUserID}}"
},
"companyID": "{{companyID}}"
}
'
```
Now that our Employee is linked with our Clockify Account we can set up the server.
### Set up an Express server
Clone our example repository at [https://github.com/zeal-corp/zeal-clockify-integration-example](https://github.com/zeal-corp/zeal-clockify-integration-example).
```bash bash theme={null}
git clone [email protected]:zeal-corp/zeal-clockify-integration-example.git
```
Create a `.env` in the root directory and add your Zeal Test API Key and the Company ID.
```bash bash theme={null}
echo "ZEAL_TEST_KEY=YOUR TEST KEY\nZEAL_COMPANY_ID=YOUR COMPANY ID" >> .env
```
### Note
For the scope of this example, we'll only process time entries for one company so use the ID of the company containing the Zeal Employee from the previous step.
With our environmental variables configured, we can start the server by running `npm run dev`. You should see the following output in your terminal.
```bash bash theme={null}
$ 🦓🦓🦓 [SERVER_START]: Server is running at http://localhost:3000
```
### Expose the server to the public web using ngrok
Next we'll need to install ngrok and configure our ngrok authorization token. Follow the instructions [here](https://ngrok.com/download) to do so.
Once the configuration of ngrok is complete we can run the following line in the terminal to expose our Express server to the internet.
```bash bash theme={null}
ngrok http 3000
```
An ngrok window will open in your terminal and display the following:
```bash bash theme={null}
Session Status online
Account Your Name (Plan: Free)
Version 3.0.7
Region South America (sa)
Latency 157ms
Web Interface http://127.0.0.1:4040
Forwarding https://83d8-193-37-252-220.sa.ngrok.io -> http://
Connections ttl opn rt1 rt5 p50 p90
2 0 0.01 0.00 5.20 5.39
HTTP Requests
----------------
```
Copy the URL displayed next to the `Forwarding` field and store it for use in the next step. **Note:** don't stop ngrok or your Express server.
```
Forwarding https://83d8-193-37-252-220.sa.ngrok.io
```
### Add a webhook URL in Clockify
Now we want to configure our webhook in our Clockify dashboard.
Navigate back to the [user settings](https://app.clockify.me/user/settings) in Clockify and click **Manage webhooks** at the bottom.
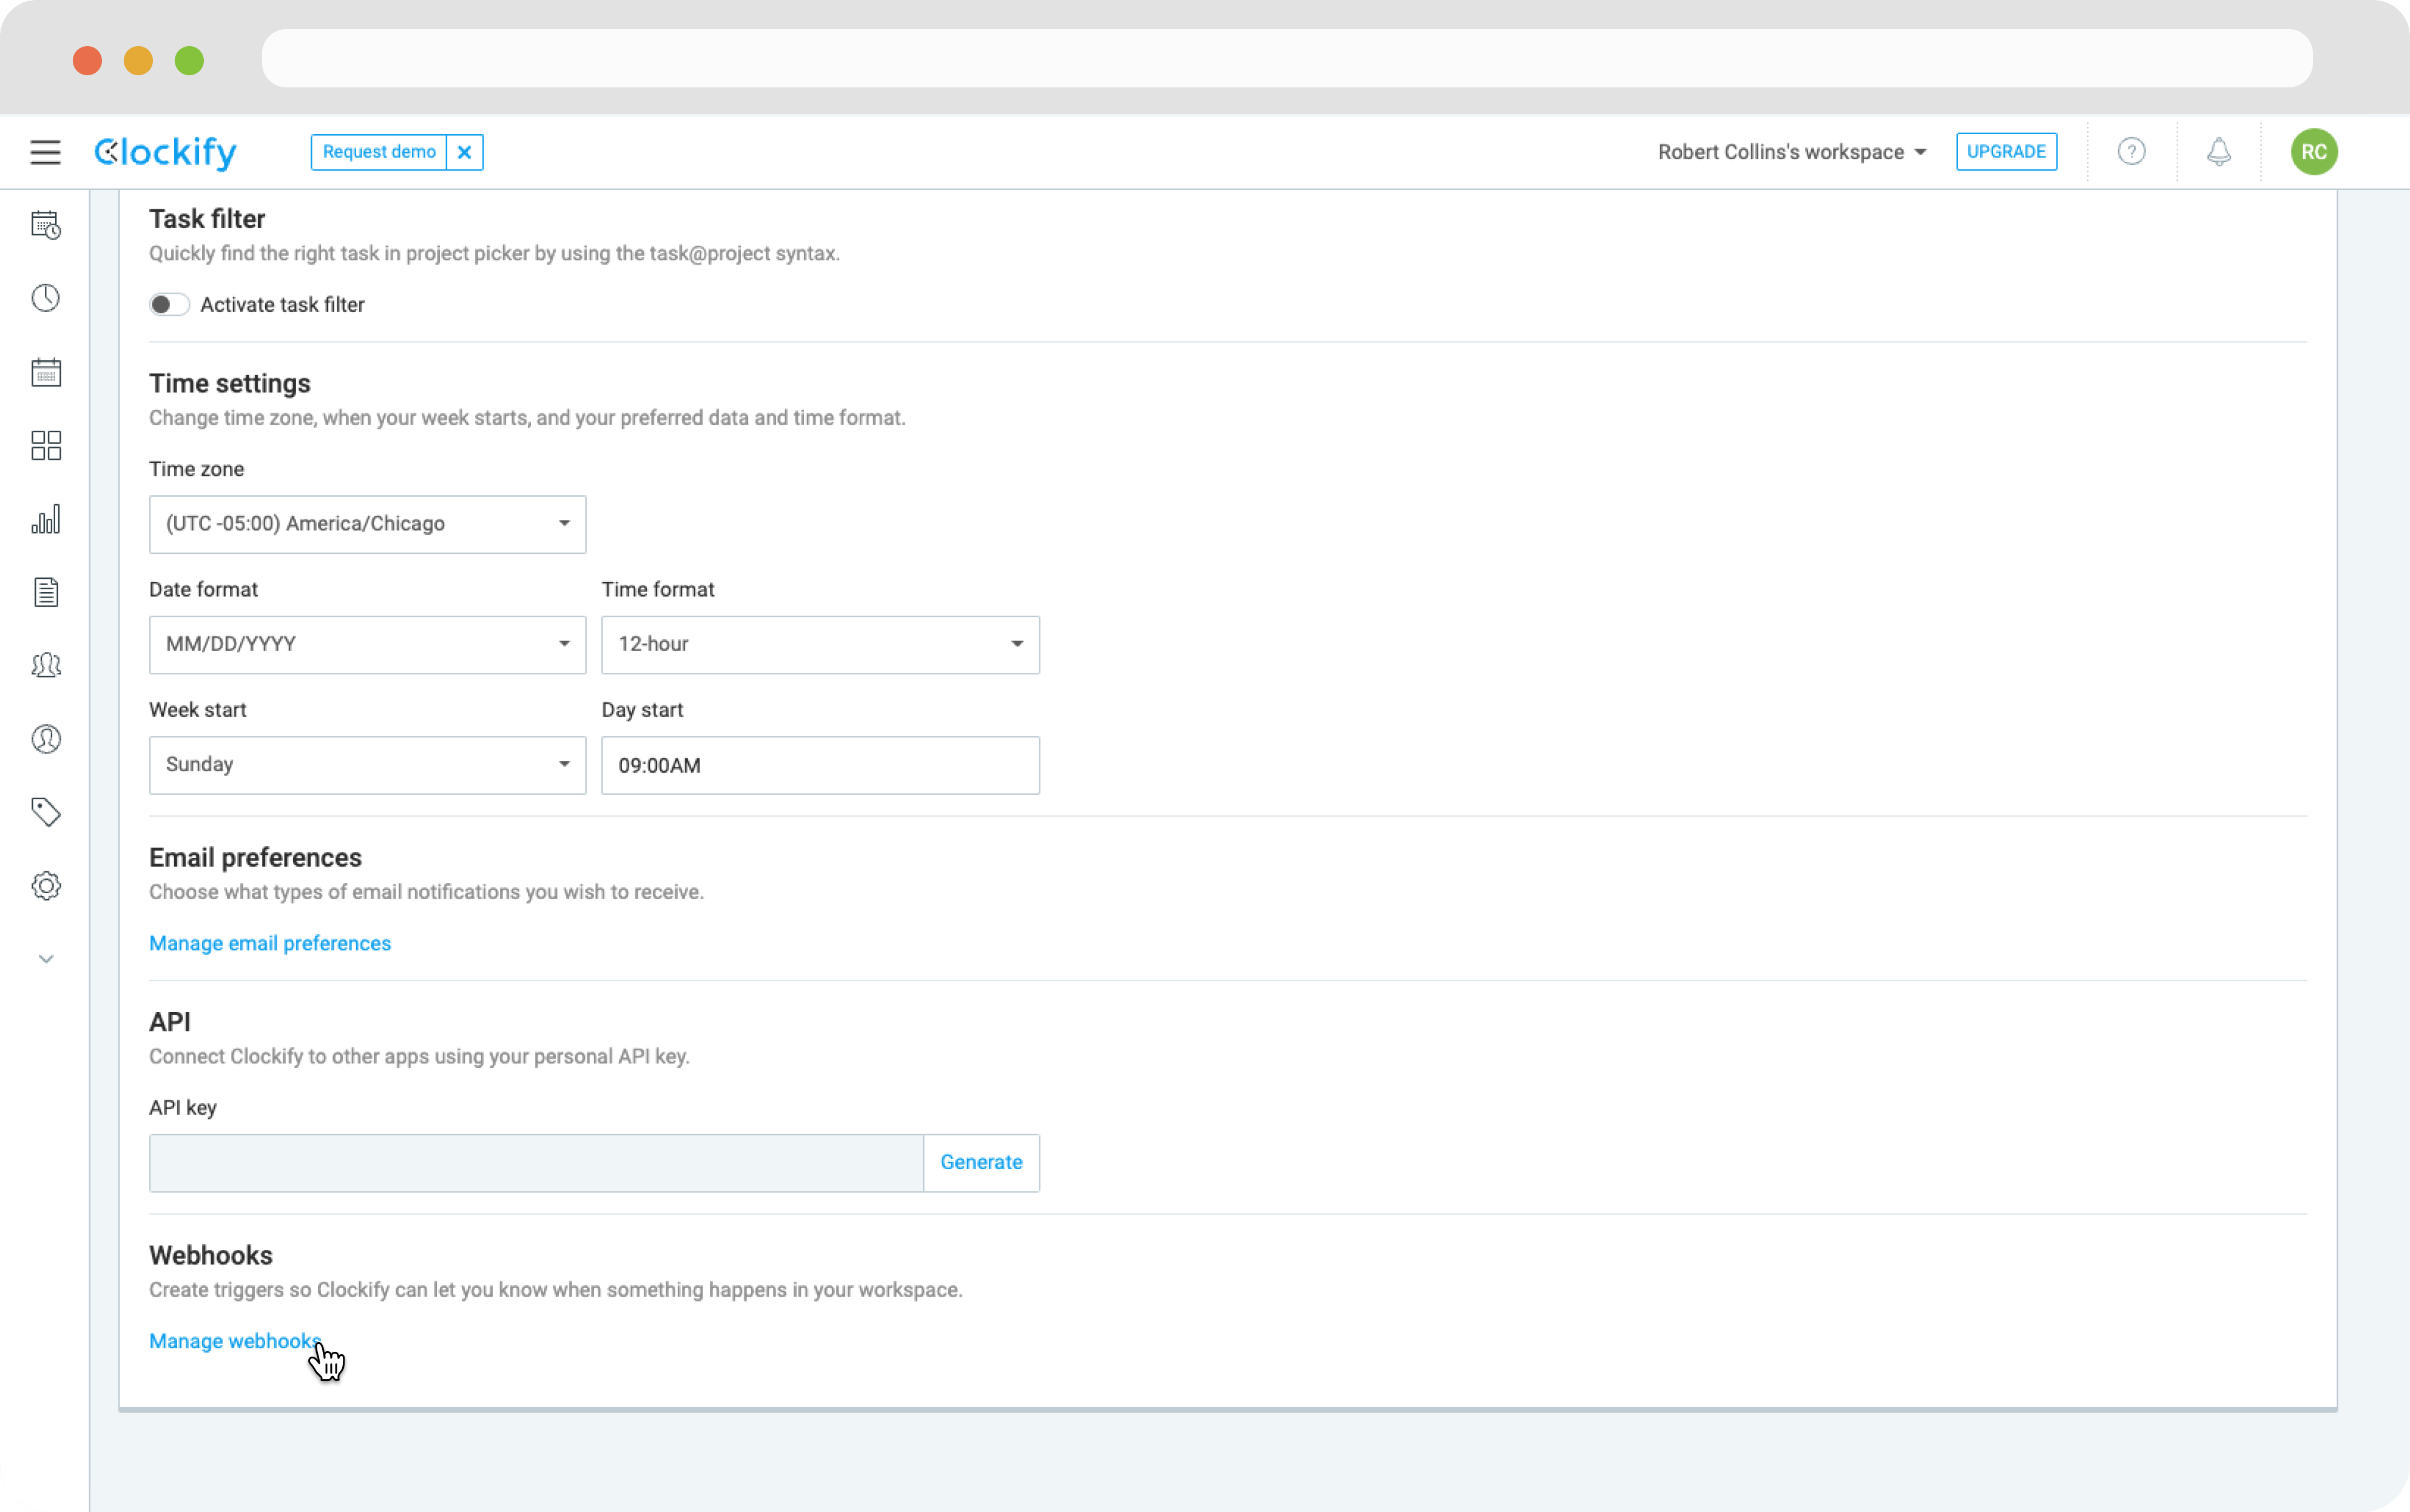 On the following page click **Create New** in the top right corner. In the modal the appears, as shown below, set the **Endpoint URL** to the ngrok URL from the previous step + `/time-entry/timer-stopped` (the path in our controller).
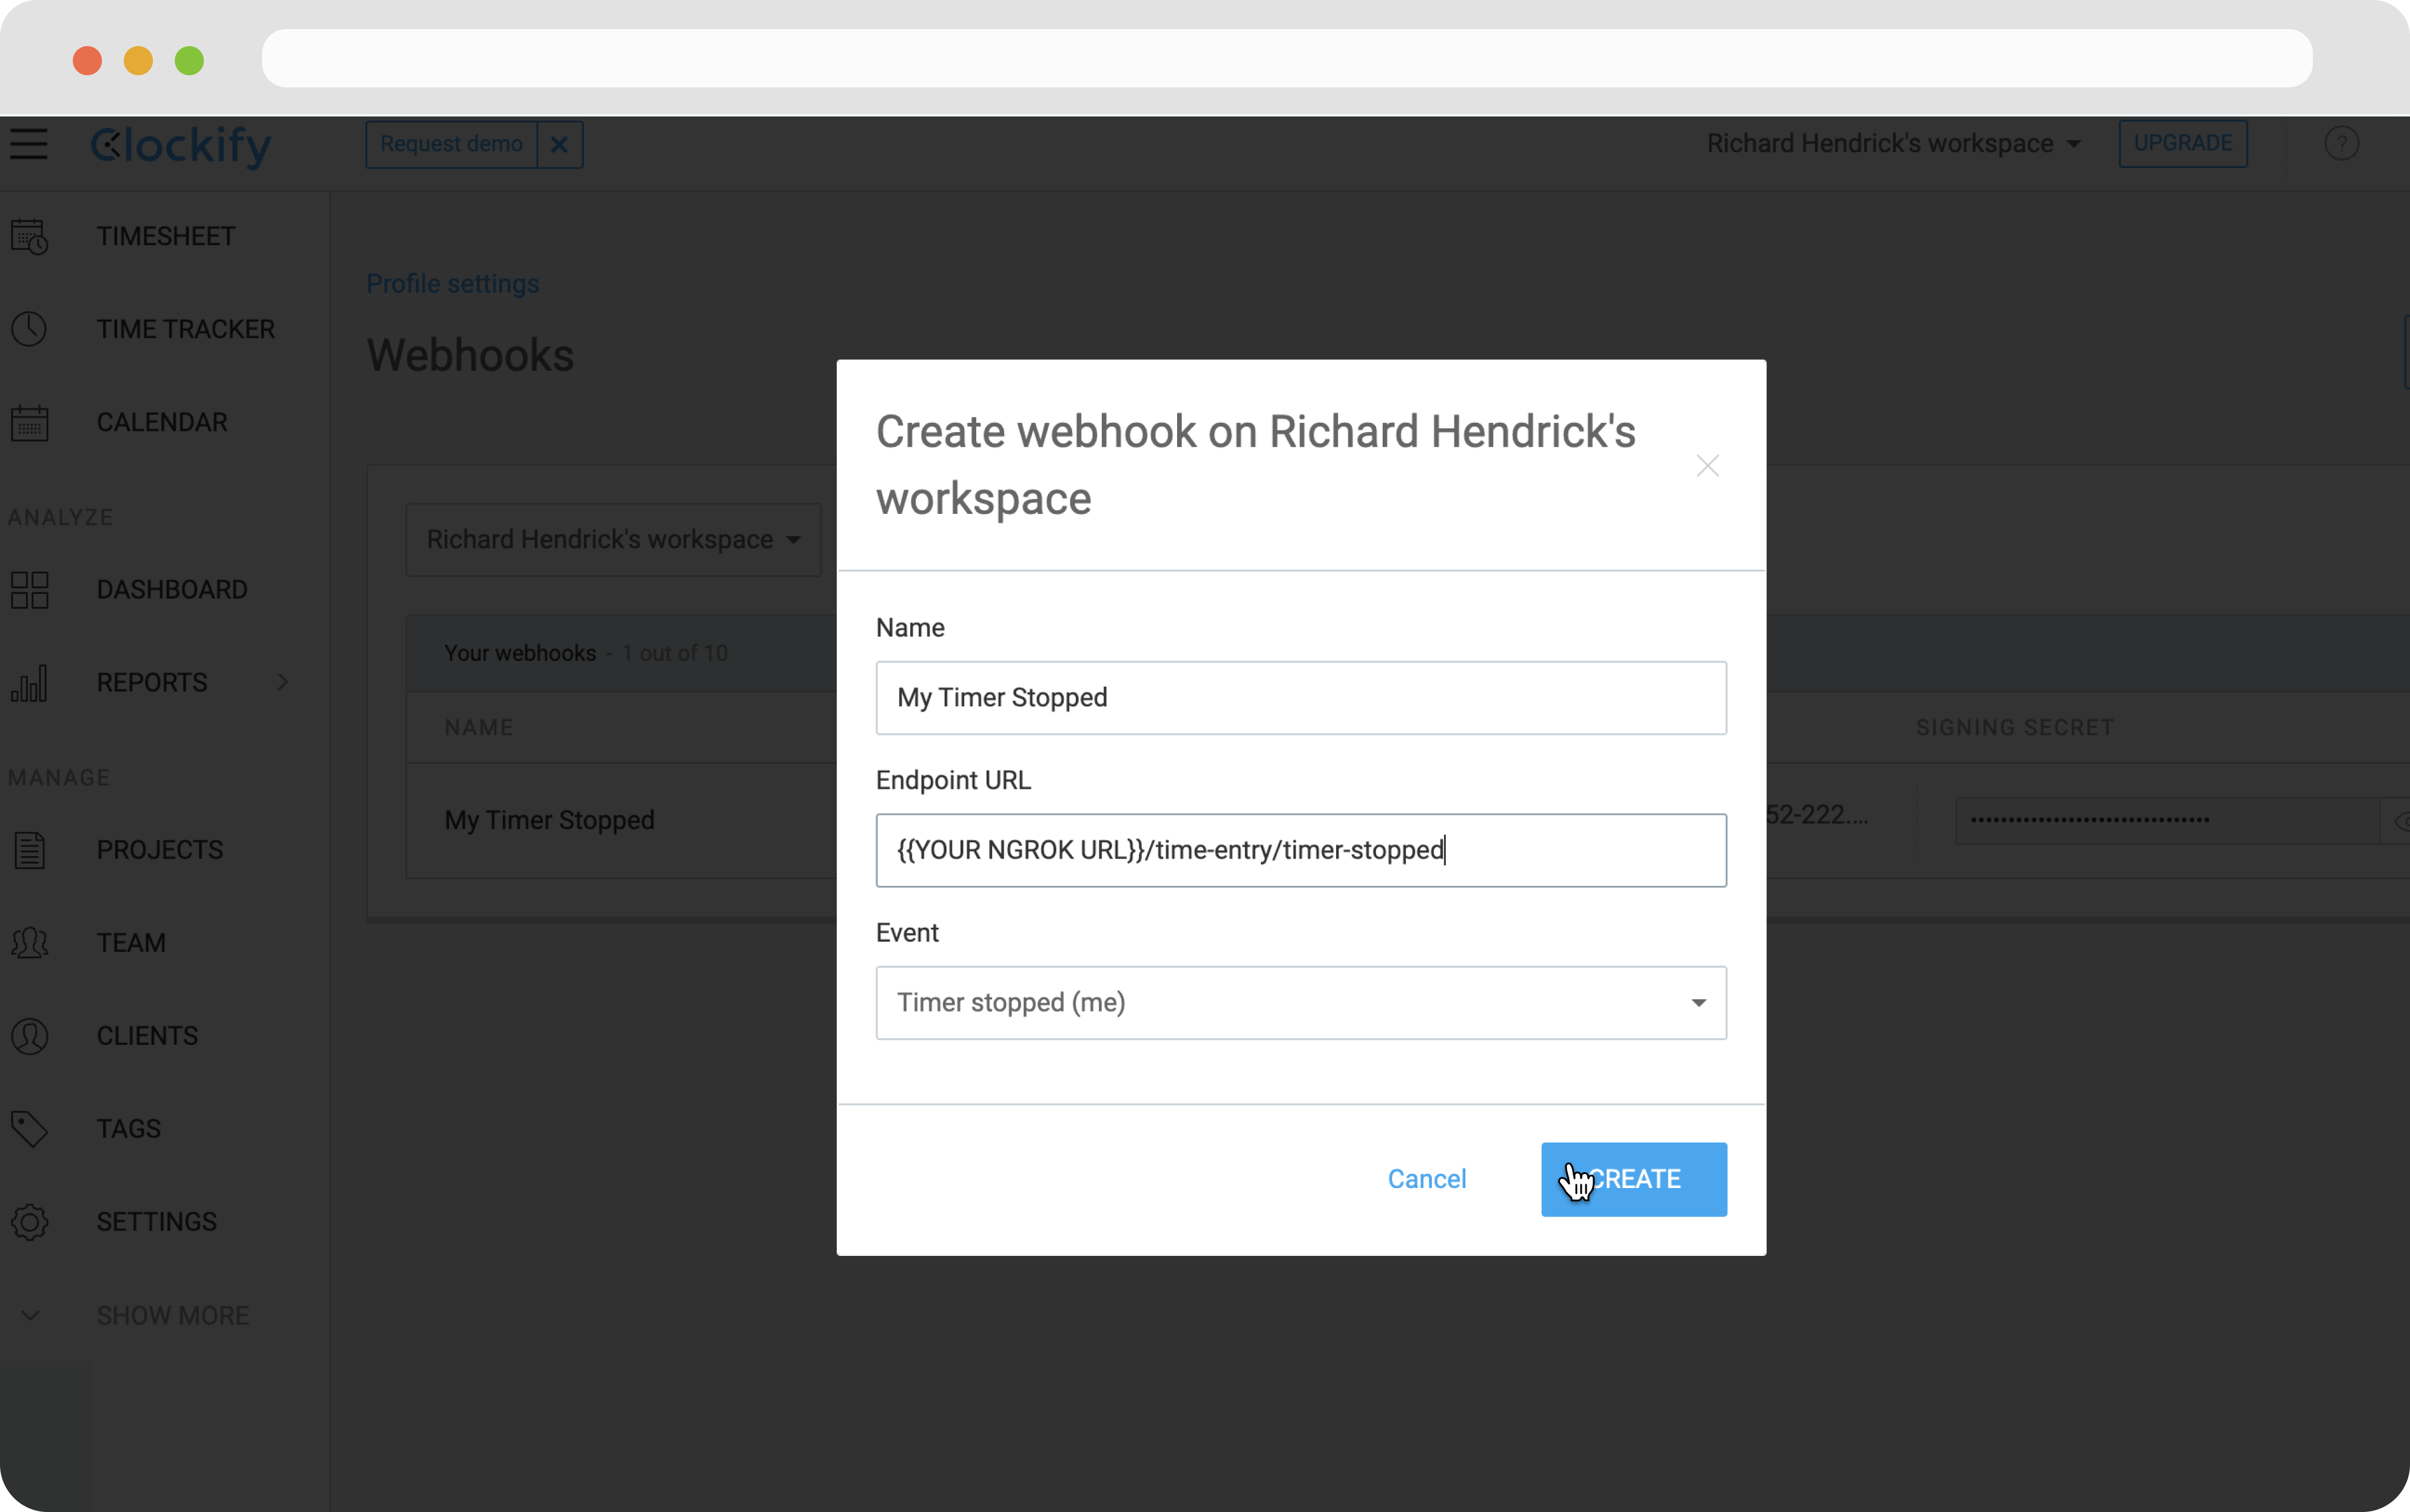 Set the **Event** to *Timer stopped (me)* then hit **Create**.
### Testing the webhook
Now for the fun part: testing that it works!
Navigate to the [time tracker](https://app.clockify.me/tracker) in Clockify and click the "Project" button.
Set the **Event** to *Timer stopped (me)* then hit **Create**.
### Testing the webhook
Now for the fun part: testing that it works!
Navigate to the [time tracker](https://app.clockify.me/tracker) in Clockify and click the "Project" button.
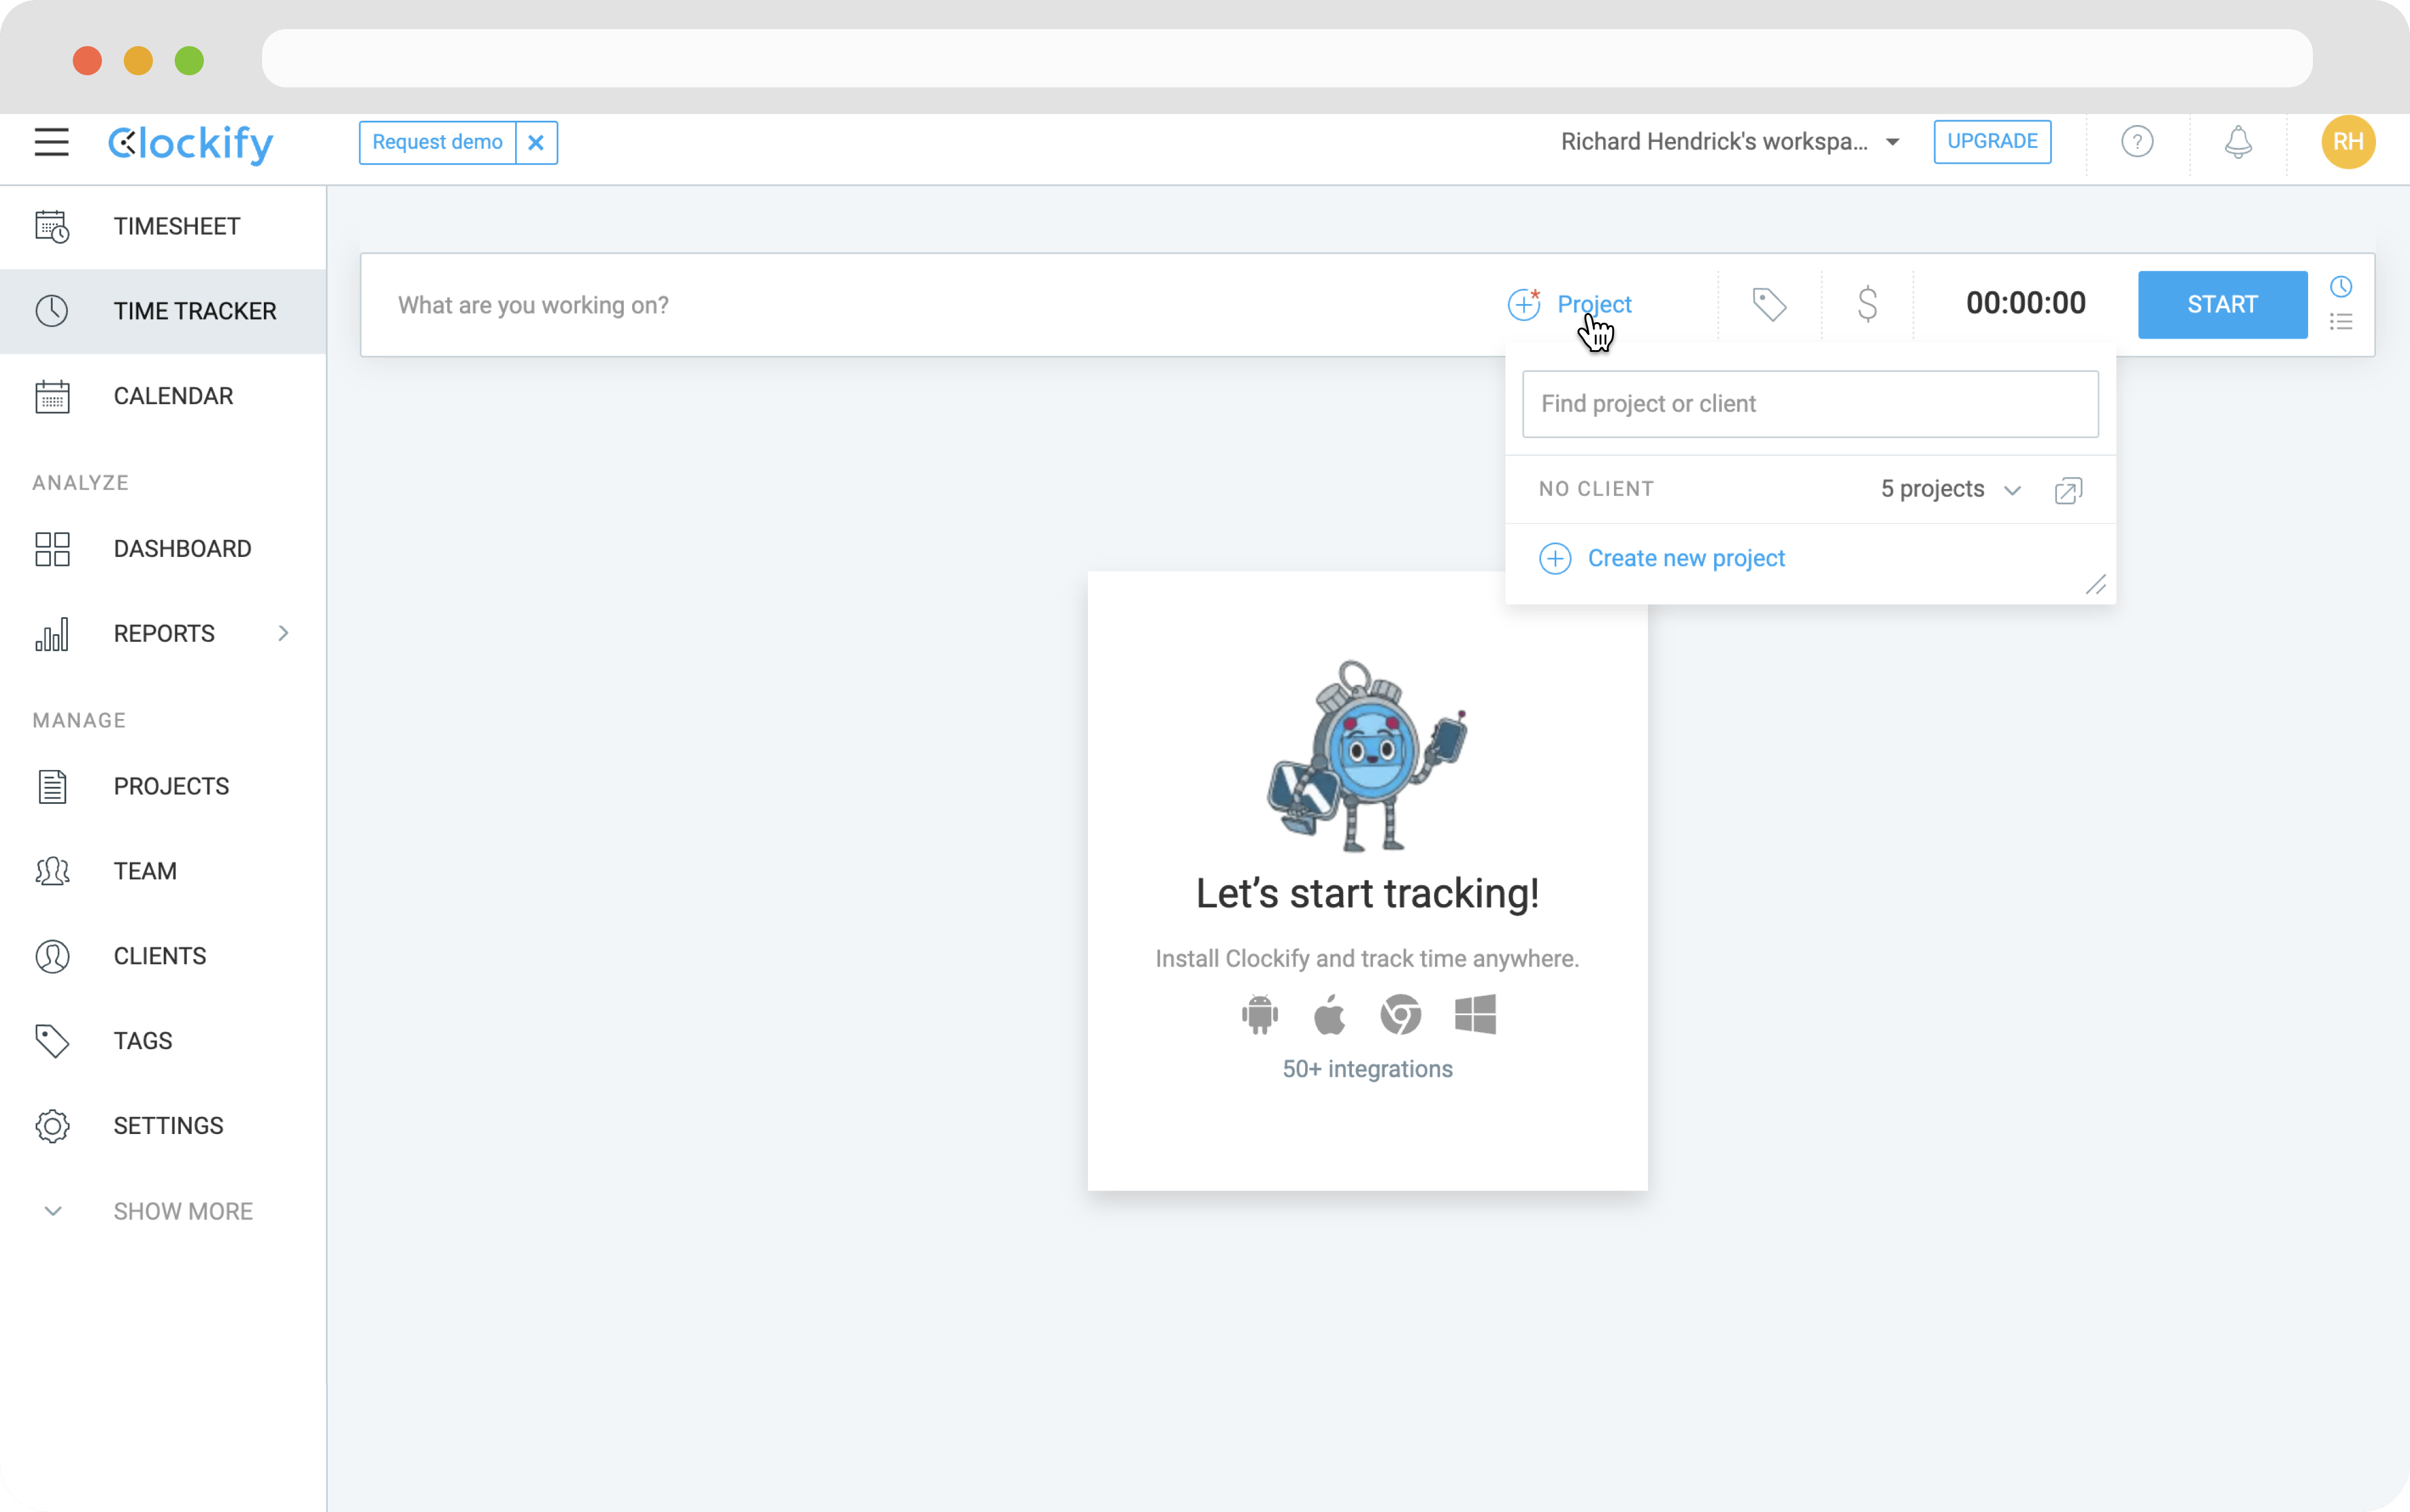 Click **Create new project**, give your project a name then hit **Create**.
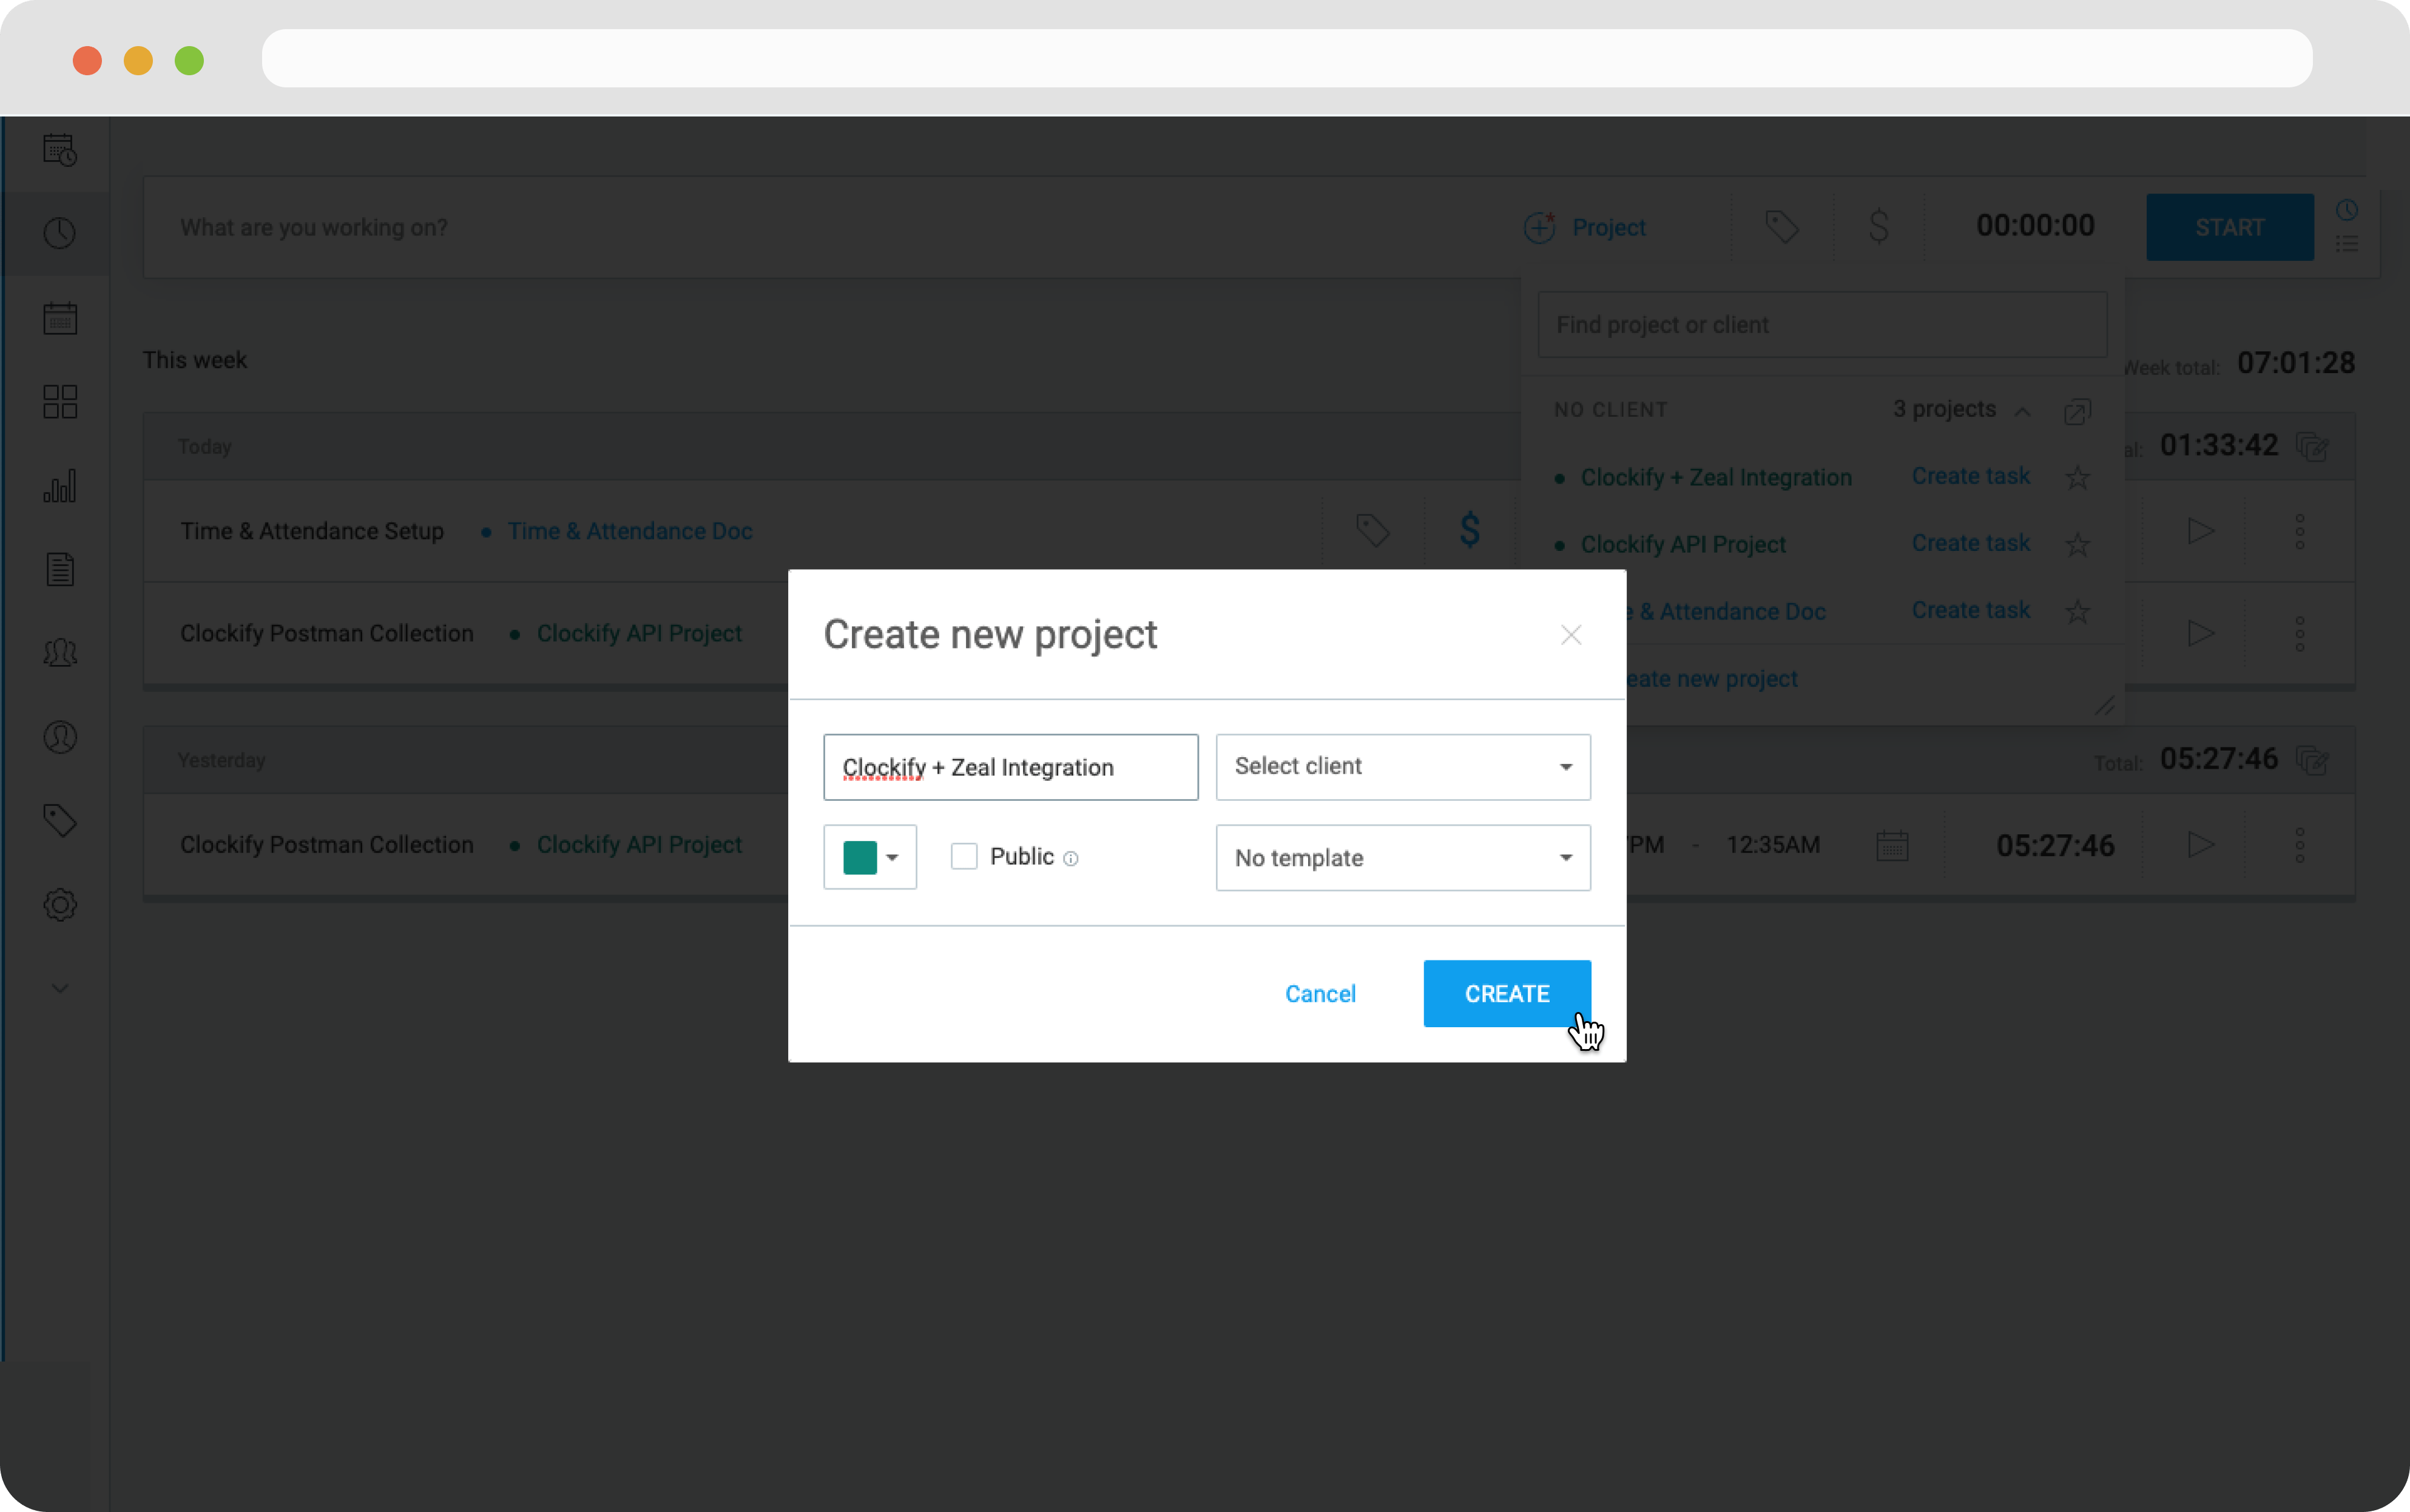 Now click the **Start** button, wait *at least 18 seconds*, then hit the **Stop** button.
### Note
You must wait at least 18 seconds because shifts are measured on an hourly basis. We must have a time duration that's enough to be rounded to at least .01 hours otherwise we'll receive an error in the logs.
Clicking the **Stop** button will trigger the *Timer Stopped (me)* Event in Clockify and the data will be POSTed to your Express server. The time entry data represented in JSON looks similar to this:
```bash bash theme={null}
{
id: '{{timeEntryId}}',
description: '',
userId: '{USERID}',
billable: true,
projectId: '{{projectId}}',
timeInterval: {
start: '2022-09-09T21:00:59Z',
end: '2022-09-09T21:01:06Z',
duration: 'PT7S'
},
workspaceId: '{{workspaceId}}',
isLocked: false,
hourlyRate: null,
costRate: null,
customFieldValues: [],
type: 'REGULAR',
kioskId: null,
currentlyRunning: false,
project: {
name: 'Blank Project',
clientId: '',
workspaceId: '{{workspaceId}}',
billable: true,
estimate: { estimate: 'PT0S', type: 'AUTO' },
color: '#FF9800',
archived: false,
clientName: '',
duration: 'PT7S',
note: '',
activeEstimate: 'NONE',
timeEstimate: {
includeNonBillable: true,
estimate: 0,
type: 'AUTO',
resetOption: null
},
budgetEstimate: null,
id: '{{projectId}}',
public: false,
template: false
},
task: null,
user: {
id: '{USERID}',
name: '{{yourName}}',
status: 'ACTIVE'
},
tags: []
}
```
The time entry data is received by our server and converted into a Shift that we then submit as an Employee Check to Zeal.
If everything was successful you should see a `201` HTTP response in the ngrok server.
```bash bash theme={null}
HTTP Requests
-------------
POST /time-entry/timer-stopped 201 Created
```
### Check the logs
Additionally, we can check the Clockify webhook logs to verify that a check was created.
Navigate back to the [user settings](https://app.clockify.me/user/settings) in Clockify and click **Manage webhooks** at the bottom.
Now click the **Start** button, wait *at least 18 seconds*, then hit the **Stop** button.
### Note
You must wait at least 18 seconds because shifts are measured on an hourly basis. We must have a time duration that's enough to be rounded to at least .01 hours otherwise we'll receive an error in the logs.
Clicking the **Stop** button will trigger the *Timer Stopped (me)* Event in Clockify and the data will be POSTed to your Express server. The time entry data represented in JSON looks similar to this:
```bash bash theme={null}
{
id: '{{timeEntryId}}',
description: '',
userId: '{USERID}',
billable: true,
projectId: '{{projectId}}',
timeInterval: {
start: '2022-09-09T21:00:59Z',
end: '2022-09-09T21:01:06Z',
duration: 'PT7S'
},
workspaceId: '{{workspaceId}}',
isLocked: false,
hourlyRate: null,
costRate: null,
customFieldValues: [],
type: 'REGULAR',
kioskId: null,
currentlyRunning: false,
project: {
name: 'Blank Project',
clientId: '',
workspaceId: '{{workspaceId}}',
billable: true,
estimate: { estimate: 'PT0S', type: 'AUTO' },
color: '#FF9800',
archived: false,
clientName: '',
duration: 'PT7S',
note: '',
activeEstimate: 'NONE',
timeEstimate: {
includeNonBillable: true,
estimate: 0,
type: 'AUTO',
resetOption: null
},
budgetEstimate: null,
id: '{{projectId}}',
public: false,
template: false
},
task: null,
user: {
id: '{USERID}',
name: '{{yourName}}',
status: 'ACTIVE'
},
tags: []
}
```
The time entry data is received by our server and converted into a Shift that we then submit as an Employee Check to Zeal.
If everything was successful you should see a `201` HTTP response in the ngrok server.
```bash bash theme={null}
HTTP Requests
-------------
POST /time-entry/timer-stopped 201 Created
```
### Check the logs
Additionally, we can check the Clockify webhook logs to verify that a check was created.
Navigate back to the [user settings](https://app.clockify.me/user/settings) in Clockify and click **Manage webhooks** at the bottom.
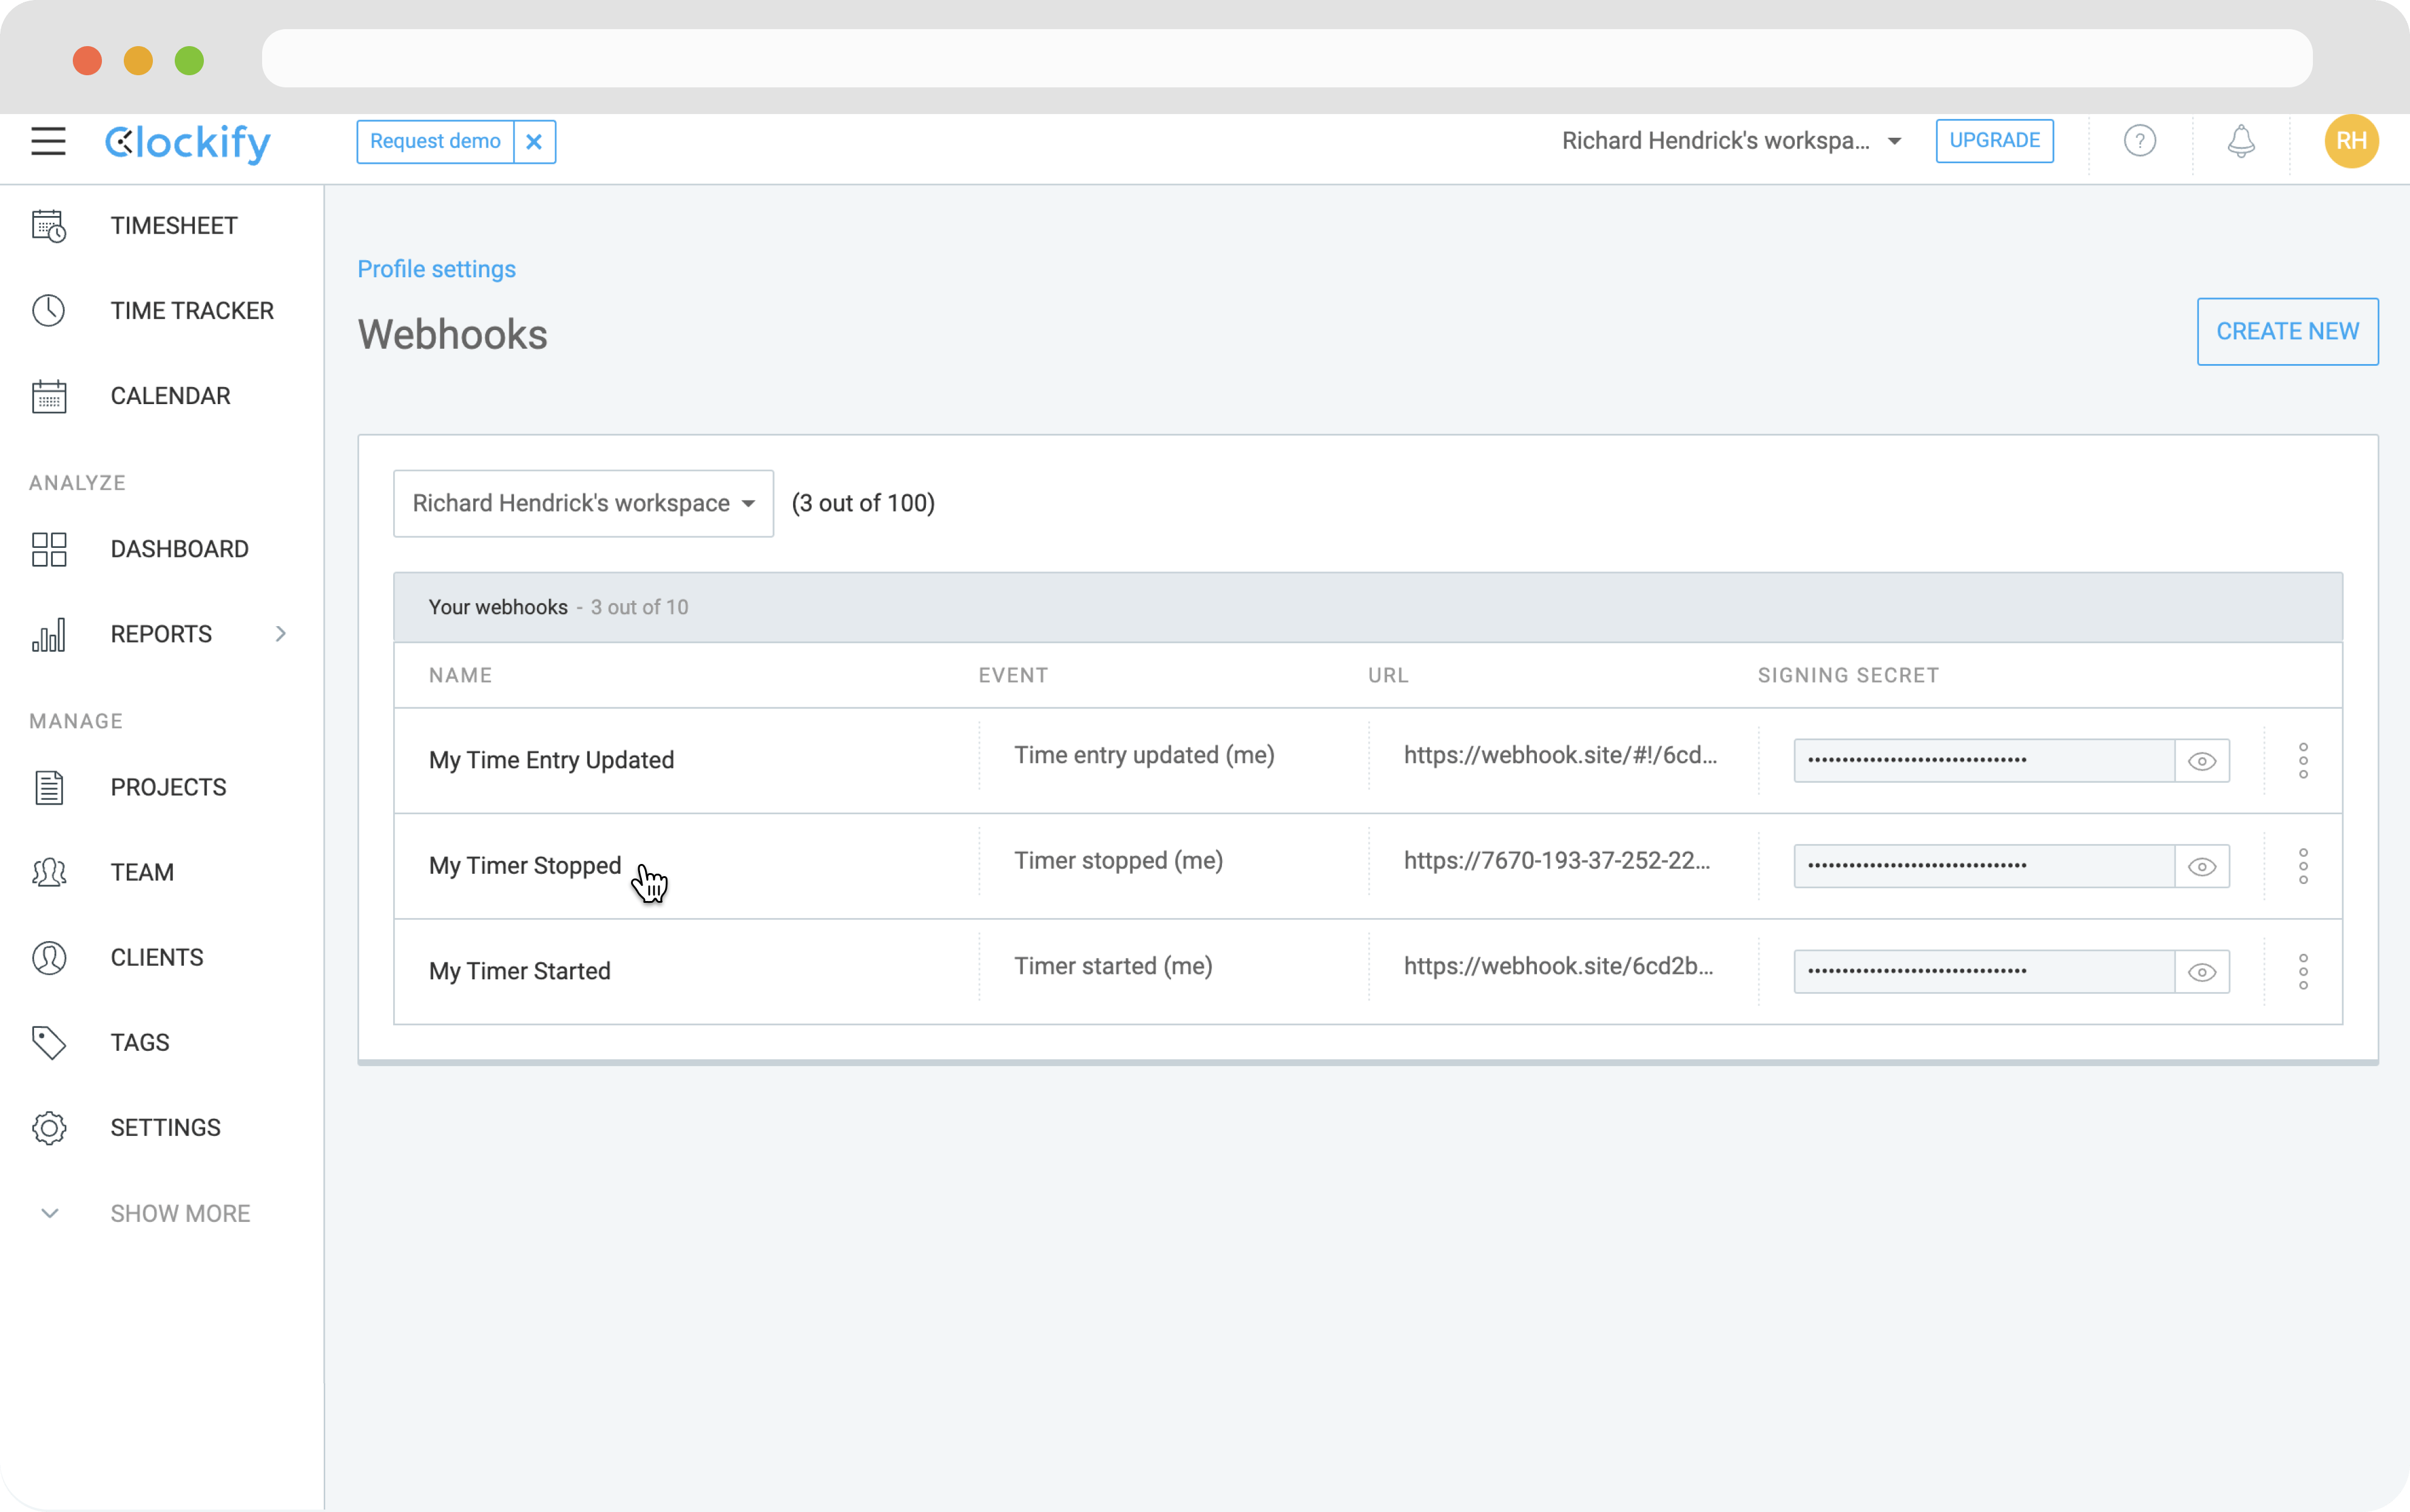
 On the next page, click **My Timer Stopped**. This will open the logs for this webhook.
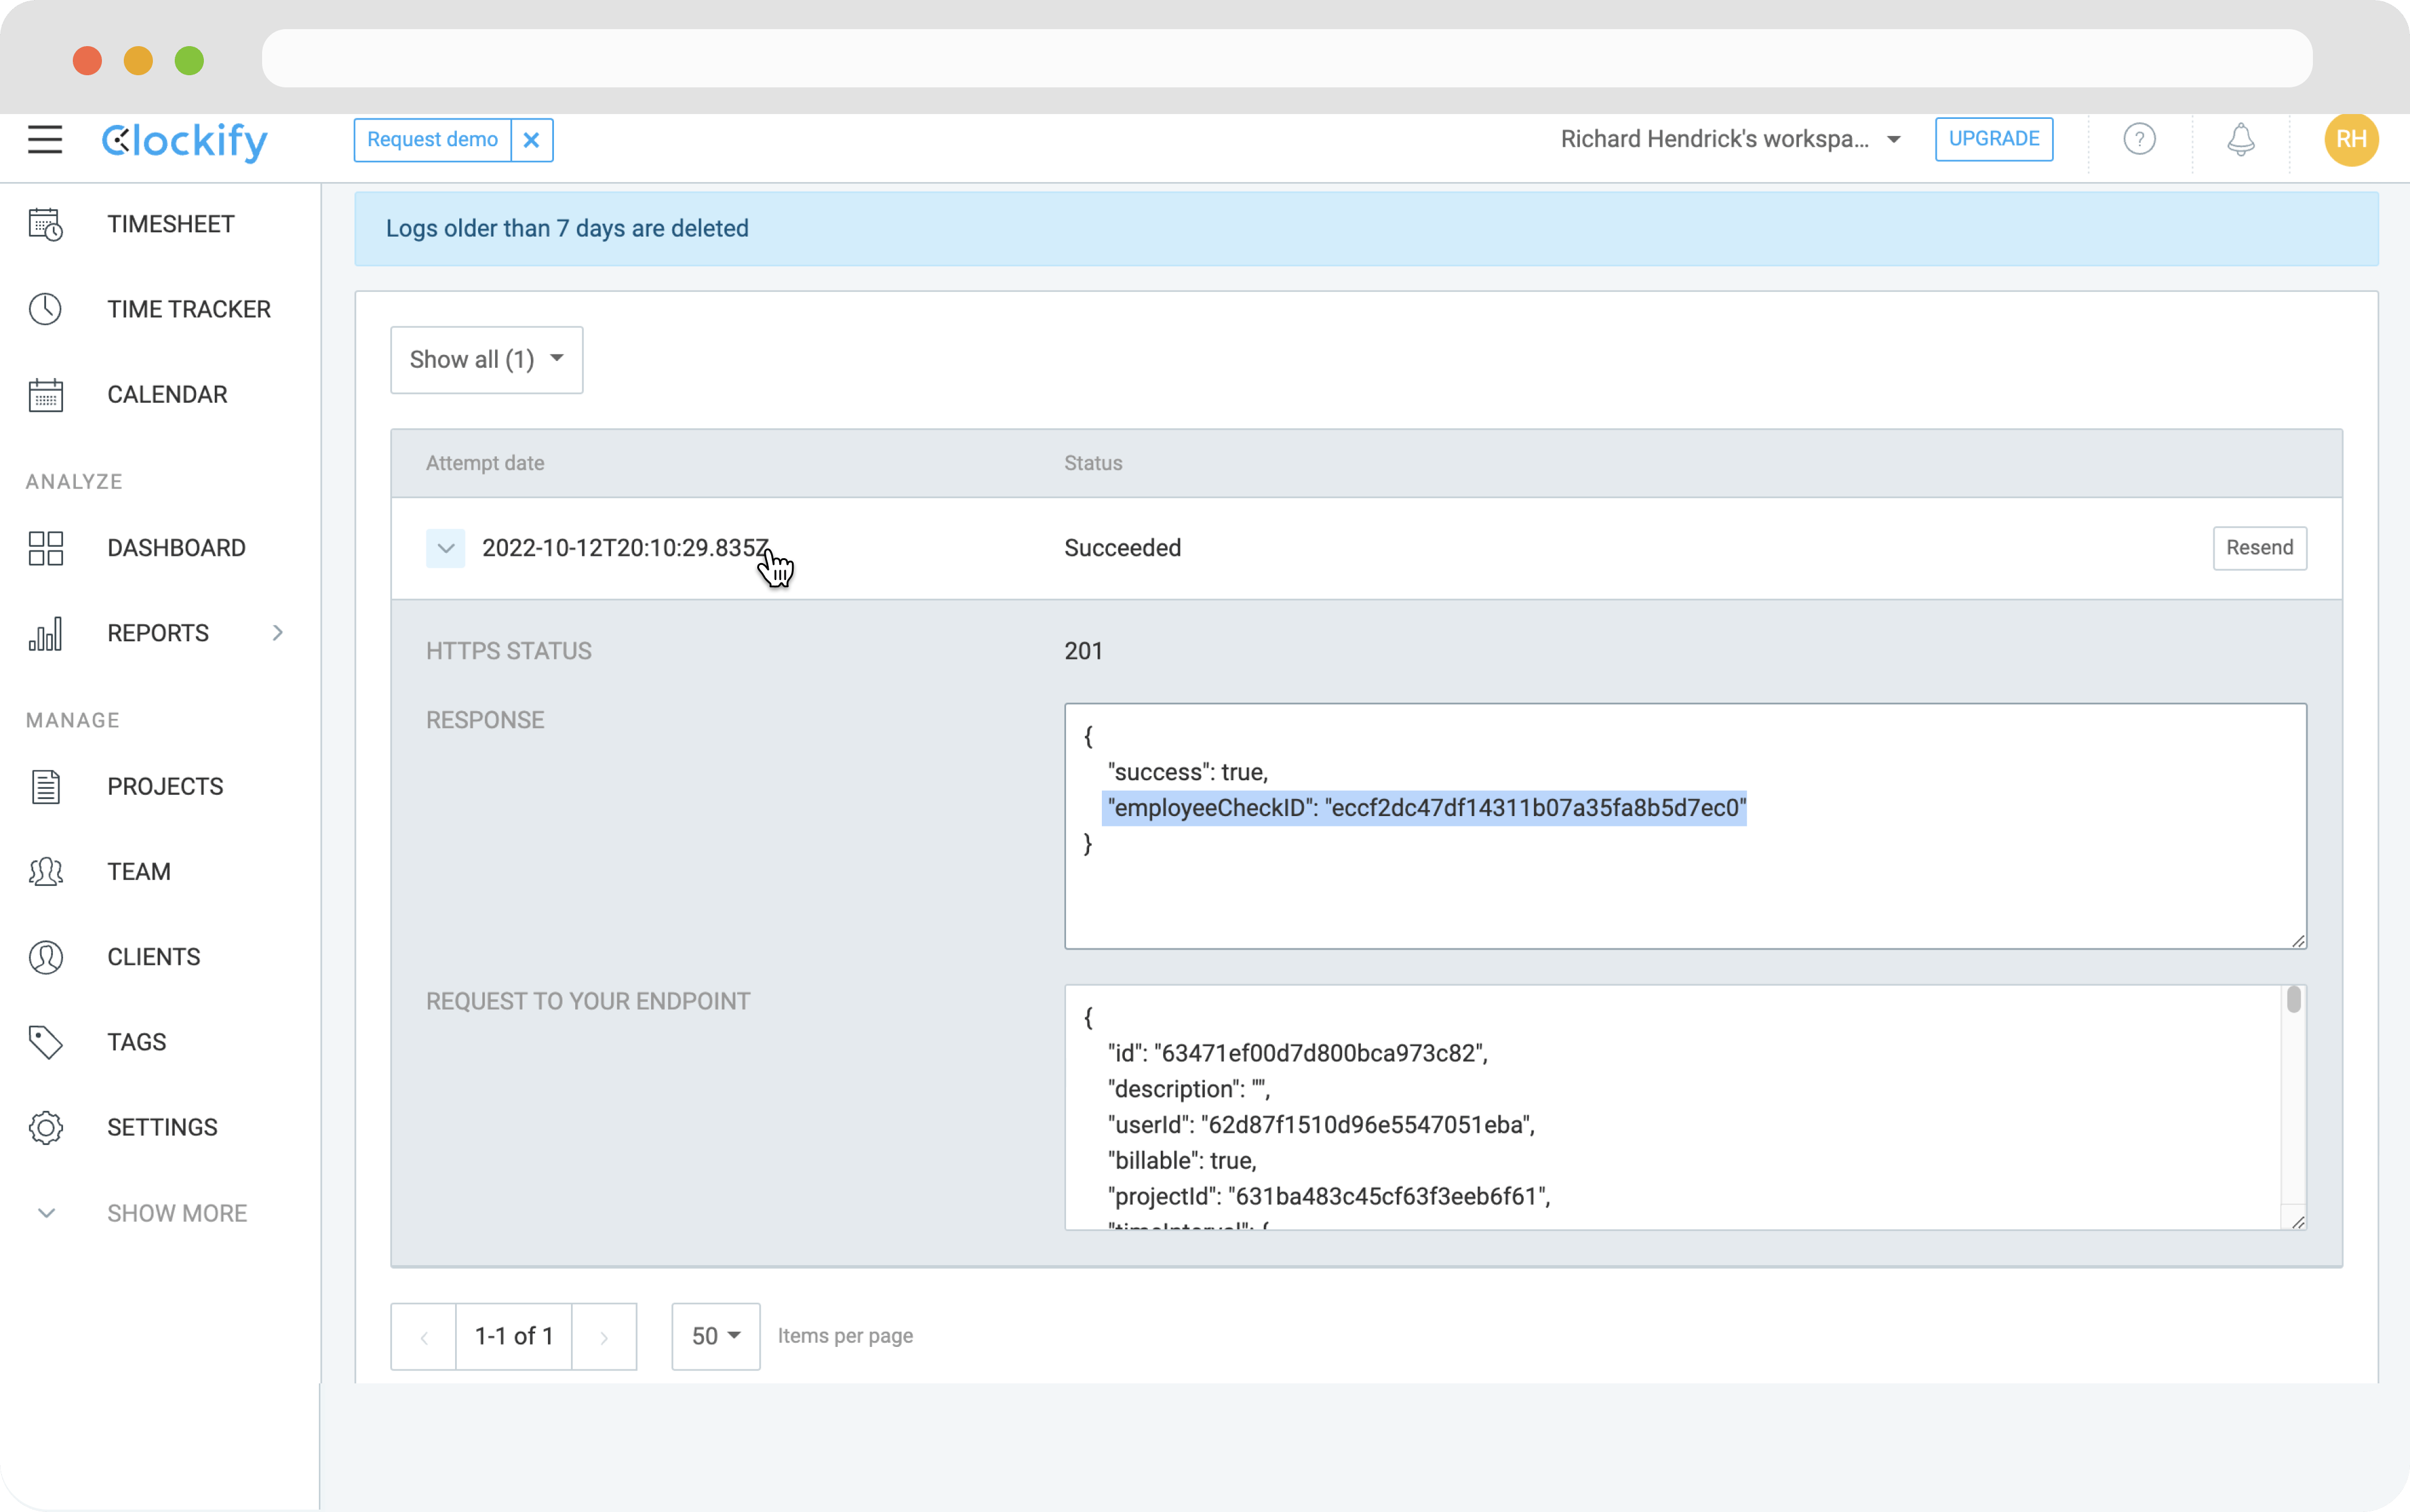
 In the logs, we should see a successful entry. If we click the timestamp, we can view the response from our server with the Zeal `employeeCheckID`.
 Finally, we can call [Get Employee Check by ID](/reference/employee-checks/employee-checks/get-employee-check-by-id) to view the Employee Check.
```bash bash theme={null}
curl --request GET \
--url 'https://api.zeal.com/employeeCheck?companyID={{companyID}}&employeeCheckID={{employeeCheckID}}' \
--header 'Accept: application/json' \
--header 'Authorization: Bearer {{testApiKey}}'
```
Amazing! We now have a fully automated way of creating/updating Employee Checks in Zeal. Now, let's take a peek at the code that got us here.
## Code review
The app (server) has two main sections that would be helpful to review:
1. The initial configuration on startup.
2. The handler for the `/time-entry/timer-stopped` route.
### App configuration
Looking into `src/config/app.config.ts` we can see that there are several variables that the app is dependent on that are being configured.
```bash bash theme={null}
// snippet from app.config.ts
const port = process.env.PORT || 3000;
let zealClient: ZealClient;
let companyID: string;
let defReportingPeriods: any[];
async function configureAppVars() {
if (!process.env.ZEAL_TEST_KEY || !process.env.ZEAL_COMPANY_ID) {
throw Error(
"Missing Configuration: Please add your ZEAL_TEST_KEY and ZEAL_COMPANY_ID in your .env file."
);
} else {
zealClient = ZealFactory.fromDefaultClient(process.env.ZEAL_TEST_KEY);
companyID = process.env.ZEAL_COMPANY_ID;
defReportingPeriods = await getDefReportingPeriodsByPayday(
"Fri",
zealClient,
companyID
);
}
}
```
### **Note:**
In a production app, we'd likely rely on a database to store data such as the `companyID` and `defReportingPeriods`, but we wanted to keep this app as simple as possible so we chose to use this workaround.
Let's walk through the ones that may not be readily apparent:
1. `zealClient`: this is basically an wrapper for the commonly used [axios library](https://axios-http.com/docs/intro) for making HTTP requests. This Zeal module found in `src/services/zeal` simply helps us make requests to Zeal's API.
2. `companyID`: nearly all requests to Zeal's API require a company ID to be passed as a parameter so we initialize that here for later use.
3. `defReportingPeriods`: this establishes a list of Reporting Periods that our app can reference internally, instead of having to make a call to the [Zeal API](/reference/employee-checks/reporting-periods/get-reporting-period-by-date-range) every time we receive Time Entry data from Clockify.
### **Tip:**
You can see the reporting periods the app is establishing by visiting [http://localhost:3000/reporting-periods](http://localhost:3000/reporting-periods) after the app starts.
A few more words on `defReportingPeriods`:
Every Zeal Employee Check should be scoped to a particular Reporting Period that describes when the work was completed. Zeal supports every potential Reporting Period for a given calendar year. Since our app is determining the Reporting Period automatically, based off the time entry data we get from Clockify, it's useful to filter the all potential Reporting Periods down to only the ones that fit our desired pay schedules.
For the purpose of this example, the logic found in `src/config/defReportingPeriods.config.ts` defines a ruleset that employees should be on a weekly pay schedule and that the Reporting Periods should end one week before any given payday.
### Note
For Example:
If the payday is "*Fri*", then Reporting Period for a 2022-09-30 check date should be 2022-09-17 - 2022-09-23.
### Time Entry Controller
The main functionality of the app is defined in `src/controllers/timeEntry.controller.ts`. Looking into the code, we can see there are 3 main process the app performs whenever it receives Time Entry data from Clockify:
```bash bash theme={null}
// snippet from timeEntry.controller.ts
export async function handleTimeEntry(
req: Request,
res: Response,
next: NextFunction
) {
try {
const employee = await findEmployeeByClockifyID(req.body.userId);
const reportingPeriod = findReportingPeriod(req.body.timeInterval?.start);
const check = await createOrUpdateEmployeeCheck(
req,
employee,
reportingPeriod
);
res
.status(201)
.json({ success: true, employeeCheckID: check.employeeCheckID });
} catch (e) {
return next(e);
}
}
```
1. The app pulls the Clockify `userId` from the request body and makes a call to Zeal to find an Employee with a matching `external_id` field.
```bash bash theme={null}
// snippet from timeEntry.controller.ts
export async function findEmployeeByClockifyID(clockifyUserId: string) {
const employees = await zealClient
.getAllEmployees({
companyID,
external_id: clockifyUserId,
});
if (employees.length) {
return employees[0];
} else {
throw new ResourceNotFoundException("Zeal Employee");
}
}
```
2. It pulls the `start` time from the request body and searches our `defReportingPeriods` to find the Reporting Period that the `start` time falls within.
```bash bash theme={null}
// snippet from timeEntry.controller.ts
// Note: this helper function is called by #findReportingPeriod
export function findMatchingReportingPeriod(
reportingPeriods: any[],
startDate: string
): any {
const reportingPeriod = reportingPeriods.find((rp) => {
const isDateWithinRP = startDate >= rp.start && startDate <= rp.end;
return isDateWithinRP;
});
return reportingPeriod;
}
```
3. It checks if there is an existing Employee Check for this Reporting Period and then makes a request to Zeal to either create a new check or update the existing check.
```bash bash theme={null}
// snippet from timeEntry.controller.ts
export async function createOrUpdateEmployeeCheck(
req: Request,
employee: any,
reportingPeriod: any
) {
/* #buildShift takes the time entry data and converts it
to a Zeal Shift Object */
const hourlyShift = buildShift(req.body.timeInterval);
const existingCheck = await getAnyExistingCheck(
employee.employeeID,
reportingPeriod.reportingPeriodID
);
if (!existingCheck) {
return await createCheck(employee.employeeID, reportingPeriod, hourlyShift);
} else {
return await updateCheck(existingCheck.employeeCheckID, hourlyShift);
}
}
```
### Summary
Ultimately, there is a bit more complexity involved in the app, but this is the main functionality. We hope that this overview gives you a great foundation to explore and expand the application as you see fit. Happy hacking!
## Recap
As you can see, with this fairly simple integration, we are able to automate the submission of time entry data that a payroll admin may traditionally have to input manually or through CSV upload. We hope that this dive into managing time and attendance data with Zeal inspires you to develop new and creative ways to improve your payroll systems. We at Zeal are excited to partner with you every step of the way!
Finally, we can call [Get Employee Check by ID](/reference/employee-checks/employee-checks/get-employee-check-by-id) to view the Employee Check.
```bash bash theme={null}
curl --request GET \
--url 'https://api.zeal.com/employeeCheck?companyID={{companyID}}&employeeCheckID={{employeeCheckID}}' \
--header 'Accept: application/json' \
--header 'Authorization: Bearer {{testApiKey}}'
```
Amazing! We now have a fully automated way of creating/updating Employee Checks in Zeal. Now, let's take a peek at the code that got us here.
## Code review
The app (server) has two main sections that would be helpful to review:
1. The initial configuration on startup.
2. The handler for the `/time-entry/timer-stopped` route.
### App configuration
Looking into `src/config/app.config.ts` we can see that there are several variables that the app is dependent on that are being configured.
```bash bash theme={null}
// snippet from app.config.ts
const port = process.env.PORT || 3000;
let zealClient: ZealClient;
let companyID: string;
let defReportingPeriods: any[];
async function configureAppVars() {
if (!process.env.ZEAL_TEST_KEY || !process.env.ZEAL_COMPANY_ID) {
throw Error(
"Missing Configuration: Please add your ZEAL_TEST_KEY and ZEAL_COMPANY_ID in your .env file."
);
} else {
zealClient = ZealFactory.fromDefaultClient(process.env.ZEAL_TEST_KEY);
companyID = process.env.ZEAL_COMPANY_ID;
defReportingPeriods = await getDefReportingPeriodsByPayday(
"Fri",
zealClient,
companyID
);
}
}
```
### **Note:**
In a production app, we'd likely rely on a database to store data such as the `companyID` and `defReportingPeriods`, but we wanted to keep this app as simple as possible so we chose to use this workaround.
Let's walk through the ones that may not be readily apparent:
1. `zealClient`: this is basically an wrapper for the commonly used [axios library](https://axios-http.com/docs/intro) for making HTTP requests. This Zeal module found in `src/services/zeal` simply helps us make requests to Zeal's API.
2. `companyID`: nearly all requests to Zeal's API require a company ID to be passed as a parameter so we initialize that here for later use.
3. `defReportingPeriods`: this establishes a list of Reporting Periods that our app can reference internally, instead of having to make a call to the [Zeal API](/reference/employee-checks/reporting-periods/get-reporting-period-by-date-range) every time we receive Time Entry data from Clockify.
### **Tip:**
You can see the reporting periods the app is establishing by visiting [http://localhost:3000/reporting-periods](http://localhost:3000/reporting-periods) after the app starts.
A few more words on `defReportingPeriods`:
Every Zeal Employee Check should be scoped to a particular Reporting Period that describes when the work was completed. Zeal supports every potential Reporting Period for a given calendar year. Since our app is determining the Reporting Period automatically, based off the time entry data we get from Clockify, it's useful to filter the all potential Reporting Periods down to only the ones that fit our desired pay schedules.
For the purpose of this example, the logic found in `src/config/defReportingPeriods.config.ts` defines a ruleset that employees should be on a weekly pay schedule and that the Reporting Periods should end one week before any given payday.
### Note
For Example:
If the payday is "*Fri*", then Reporting Period for a 2022-09-30 check date should be 2022-09-17 - 2022-09-23.
### Time Entry Controller
The main functionality of the app is defined in `src/controllers/timeEntry.controller.ts`. Looking into the code, we can see there are 3 main process the app performs whenever it receives Time Entry data from Clockify:
```bash bash theme={null}
// snippet from timeEntry.controller.ts
export async function handleTimeEntry(
req: Request,
res: Response,
next: NextFunction
) {
try {
const employee = await findEmployeeByClockifyID(req.body.userId);
const reportingPeriod = findReportingPeriod(req.body.timeInterval?.start);
const check = await createOrUpdateEmployeeCheck(
req,
employee,
reportingPeriod
);
res
.status(201)
.json({ success: true, employeeCheckID: check.employeeCheckID });
} catch (e) {
return next(e);
}
}
```
1. The app pulls the Clockify `userId` from the request body and makes a call to Zeal to find an Employee with a matching `external_id` field.
```bash bash theme={null}
// snippet from timeEntry.controller.ts
export async function findEmployeeByClockifyID(clockifyUserId: string) {
const employees = await zealClient
.getAllEmployees({
companyID,
external_id: clockifyUserId,
});
if (employees.length) {
return employees[0];
} else {
throw new ResourceNotFoundException("Zeal Employee");
}
}
```
2. It pulls the `start` time from the request body and searches our `defReportingPeriods` to find the Reporting Period that the `start` time falls within.
```bash bash theme={null}
// snippet from timeEntry.controller.ts
// Note: this helper function is called by #findReportingPeriod
export function findMatchingReportingPeriod(
reportingPeriods: any[],
startDate: string
): any {
const reportingPeriod = reportingPeriods.find((rp) => {
const isDateWithinRP = startDate >= rp.start && startDate <= rp.end;
return isDateWithinRP;
});
return reportingPeriod;
}
```
3. It checks if there is an existing Employee Check for this Reporting Period and then makes a request to Zeal to either create a new check or update the existing check.
```bash bash theme={null}
// snippet from timeEntry.controller.ts
export async function createOrUpdateEmployeeCheck(
req: Request,
employee: any,
reportingPeriod: any
) {
/* #buildShift takes the time entry data and converts it
to a Zeal Shift Object */
const hourlyShift = buildShift(req.body.timeInterval);
const existingCheck = await getAnyExistingCheck(
employee.employeeID,
reportingPeriod.reportingPeriodID
);
if (!existingCheck) {
return await createCheck(employee.employeeID, reportingPeriod, hourlyShift);
} else {
return await updateCheck(existingCheck.employeeCheckID, hourlyShift);
}
}
```
### Summary
Ultimately, there is a bit more complexity involved in the app, but this is the main functionality. We hope that this overview gives you a great foundation to explore and expand the application as you see fit. Happy hacking!
## Recap
As you can see, with this fairly simple integration, we are able to automate the submission of time entry data that a payroll admin may traditionally have to input manually or through CSV upload. We hope that this dive into managing time and attendance data with Zeal inspires you to develop new and creative ways to improve your payroll systems. We at Zeal are excited to partner with you every step of the way!